PolyUMI: Visual + Auditory + Tactile Manipulation Platform for Imitation Learning
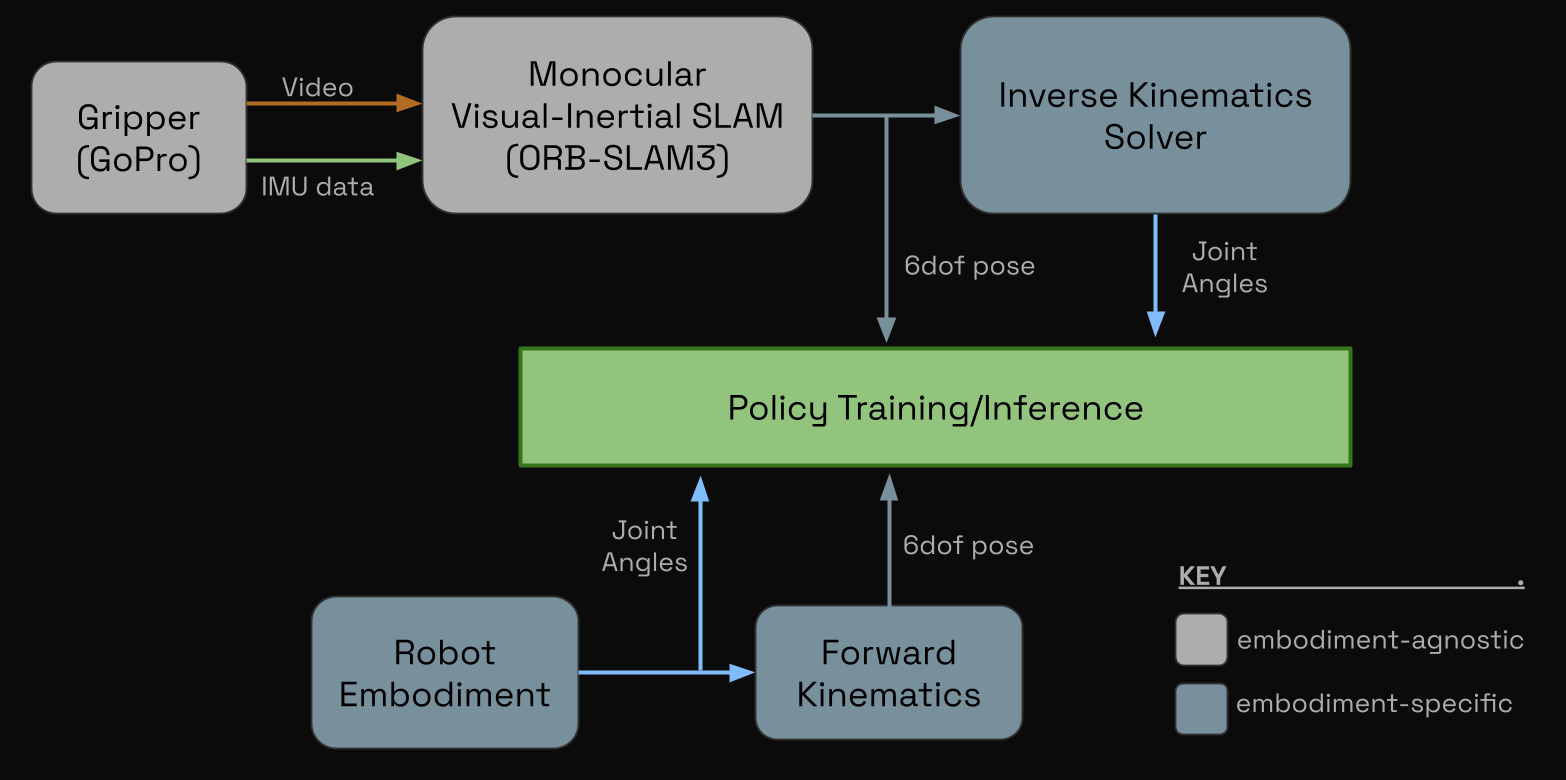
PolyUMI is a novel real-time data collection & control platform for robotic imitation learning, which unifies the following sensor modalities in a single end-effector:
- touch (via a custom optical tactile-sensing finger, based off of PolyTouch) - 10fps 540x480 MJPEG video (MP4)
- mechanical vibration (via a contact microphone fixed to the finger housing) - 16kHz PCM audio (WAV)
- vision (via GoPro camera on wrist + finger camera peripheral vision) - 60fps 1920x1080 MJPEG video (MP4) + 10fps 540x480 MJPEG video
- proprioception (via monocular inertial SLAM from GoPro + IMU in gripper, or robot joint encoders + FK in embodiments)
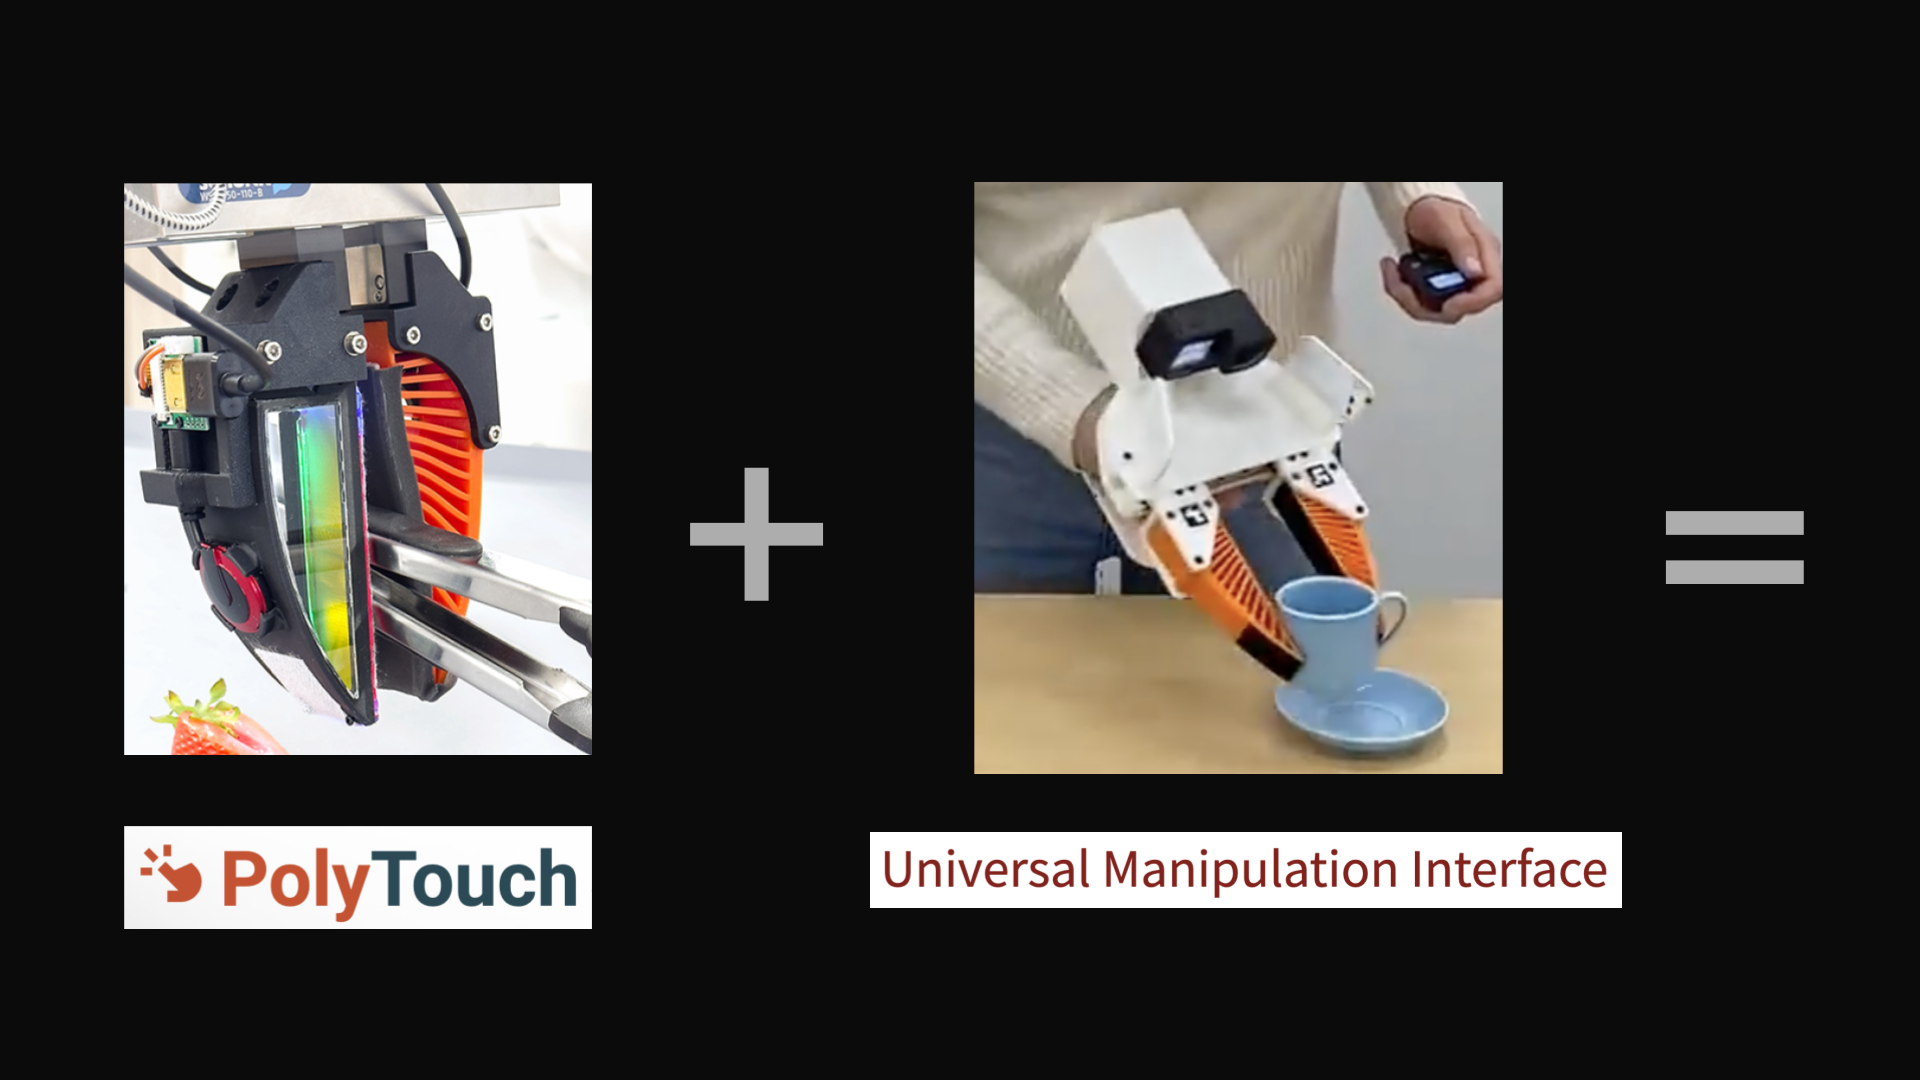
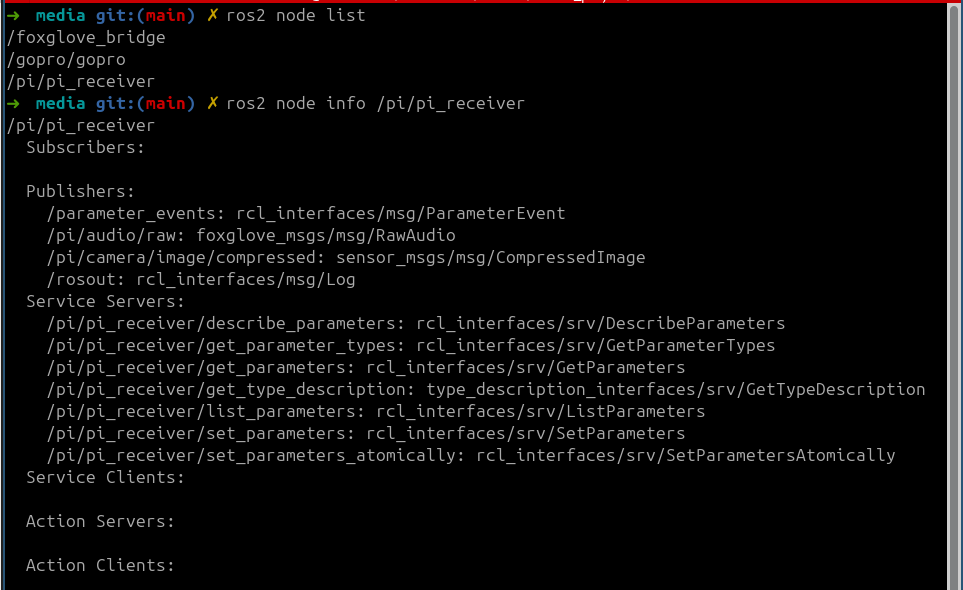
It combines the Universal Manipulation Interface (UMI) platform with a custom touch-sensing finger inspired by the PolyTouch tactile + audio sensor, with hardware, firmware, and software built from scratch for a modern robotics stack (ROS2 Kilted + Python 3.13 + Foxglove visualizer) [1, 2].

Philosophically, my inspiration for this project comes from my belief that embodied AI’s greatest ally is hardware-software co-design. AI taking over the planning & control layers of the robotics stack means a more flexible, agile, intuitive approach to hardware and sensing is possible.
With the completion of this phase of the PolyUMI project, I’m now able to pursue multimodal imitation learning research on my own research platform built from the bottom-up; this means that my iteration on model performance will include iteration on the full design, including the hardware itself.
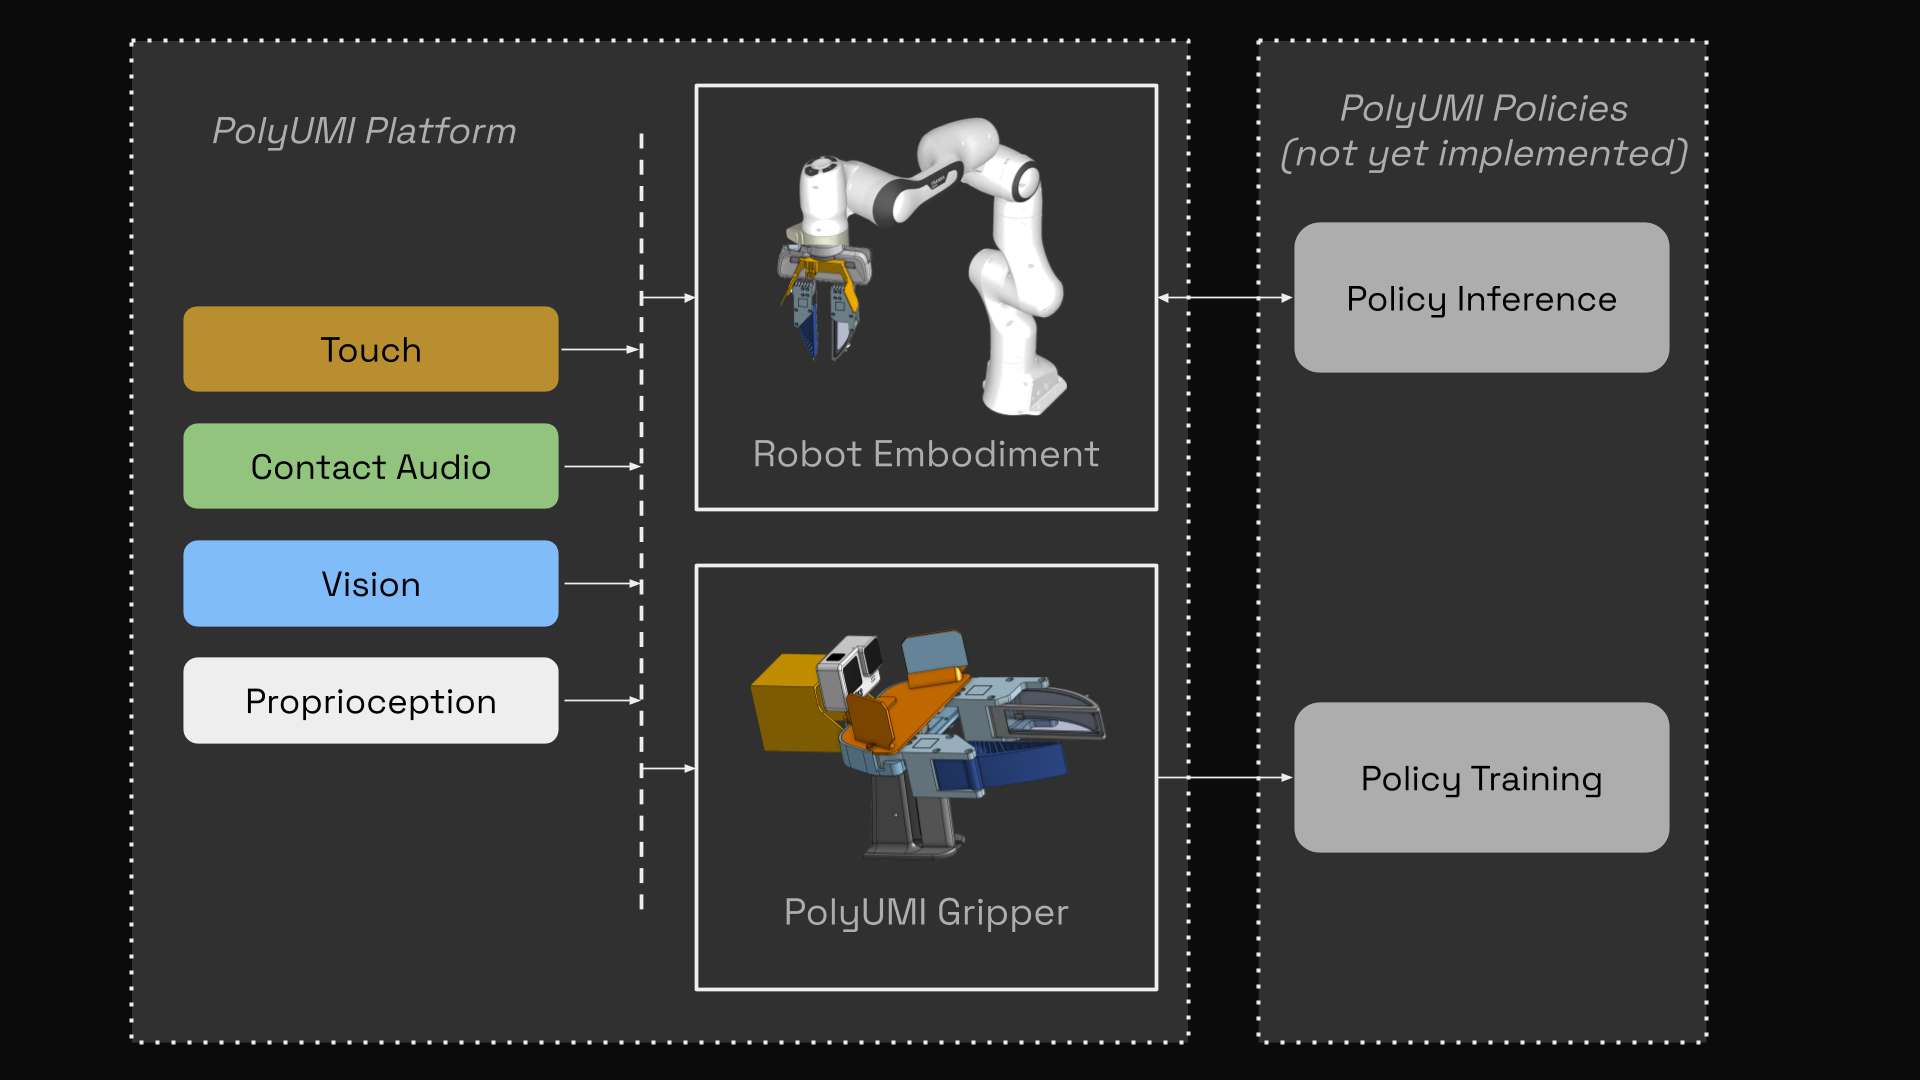
System Overview
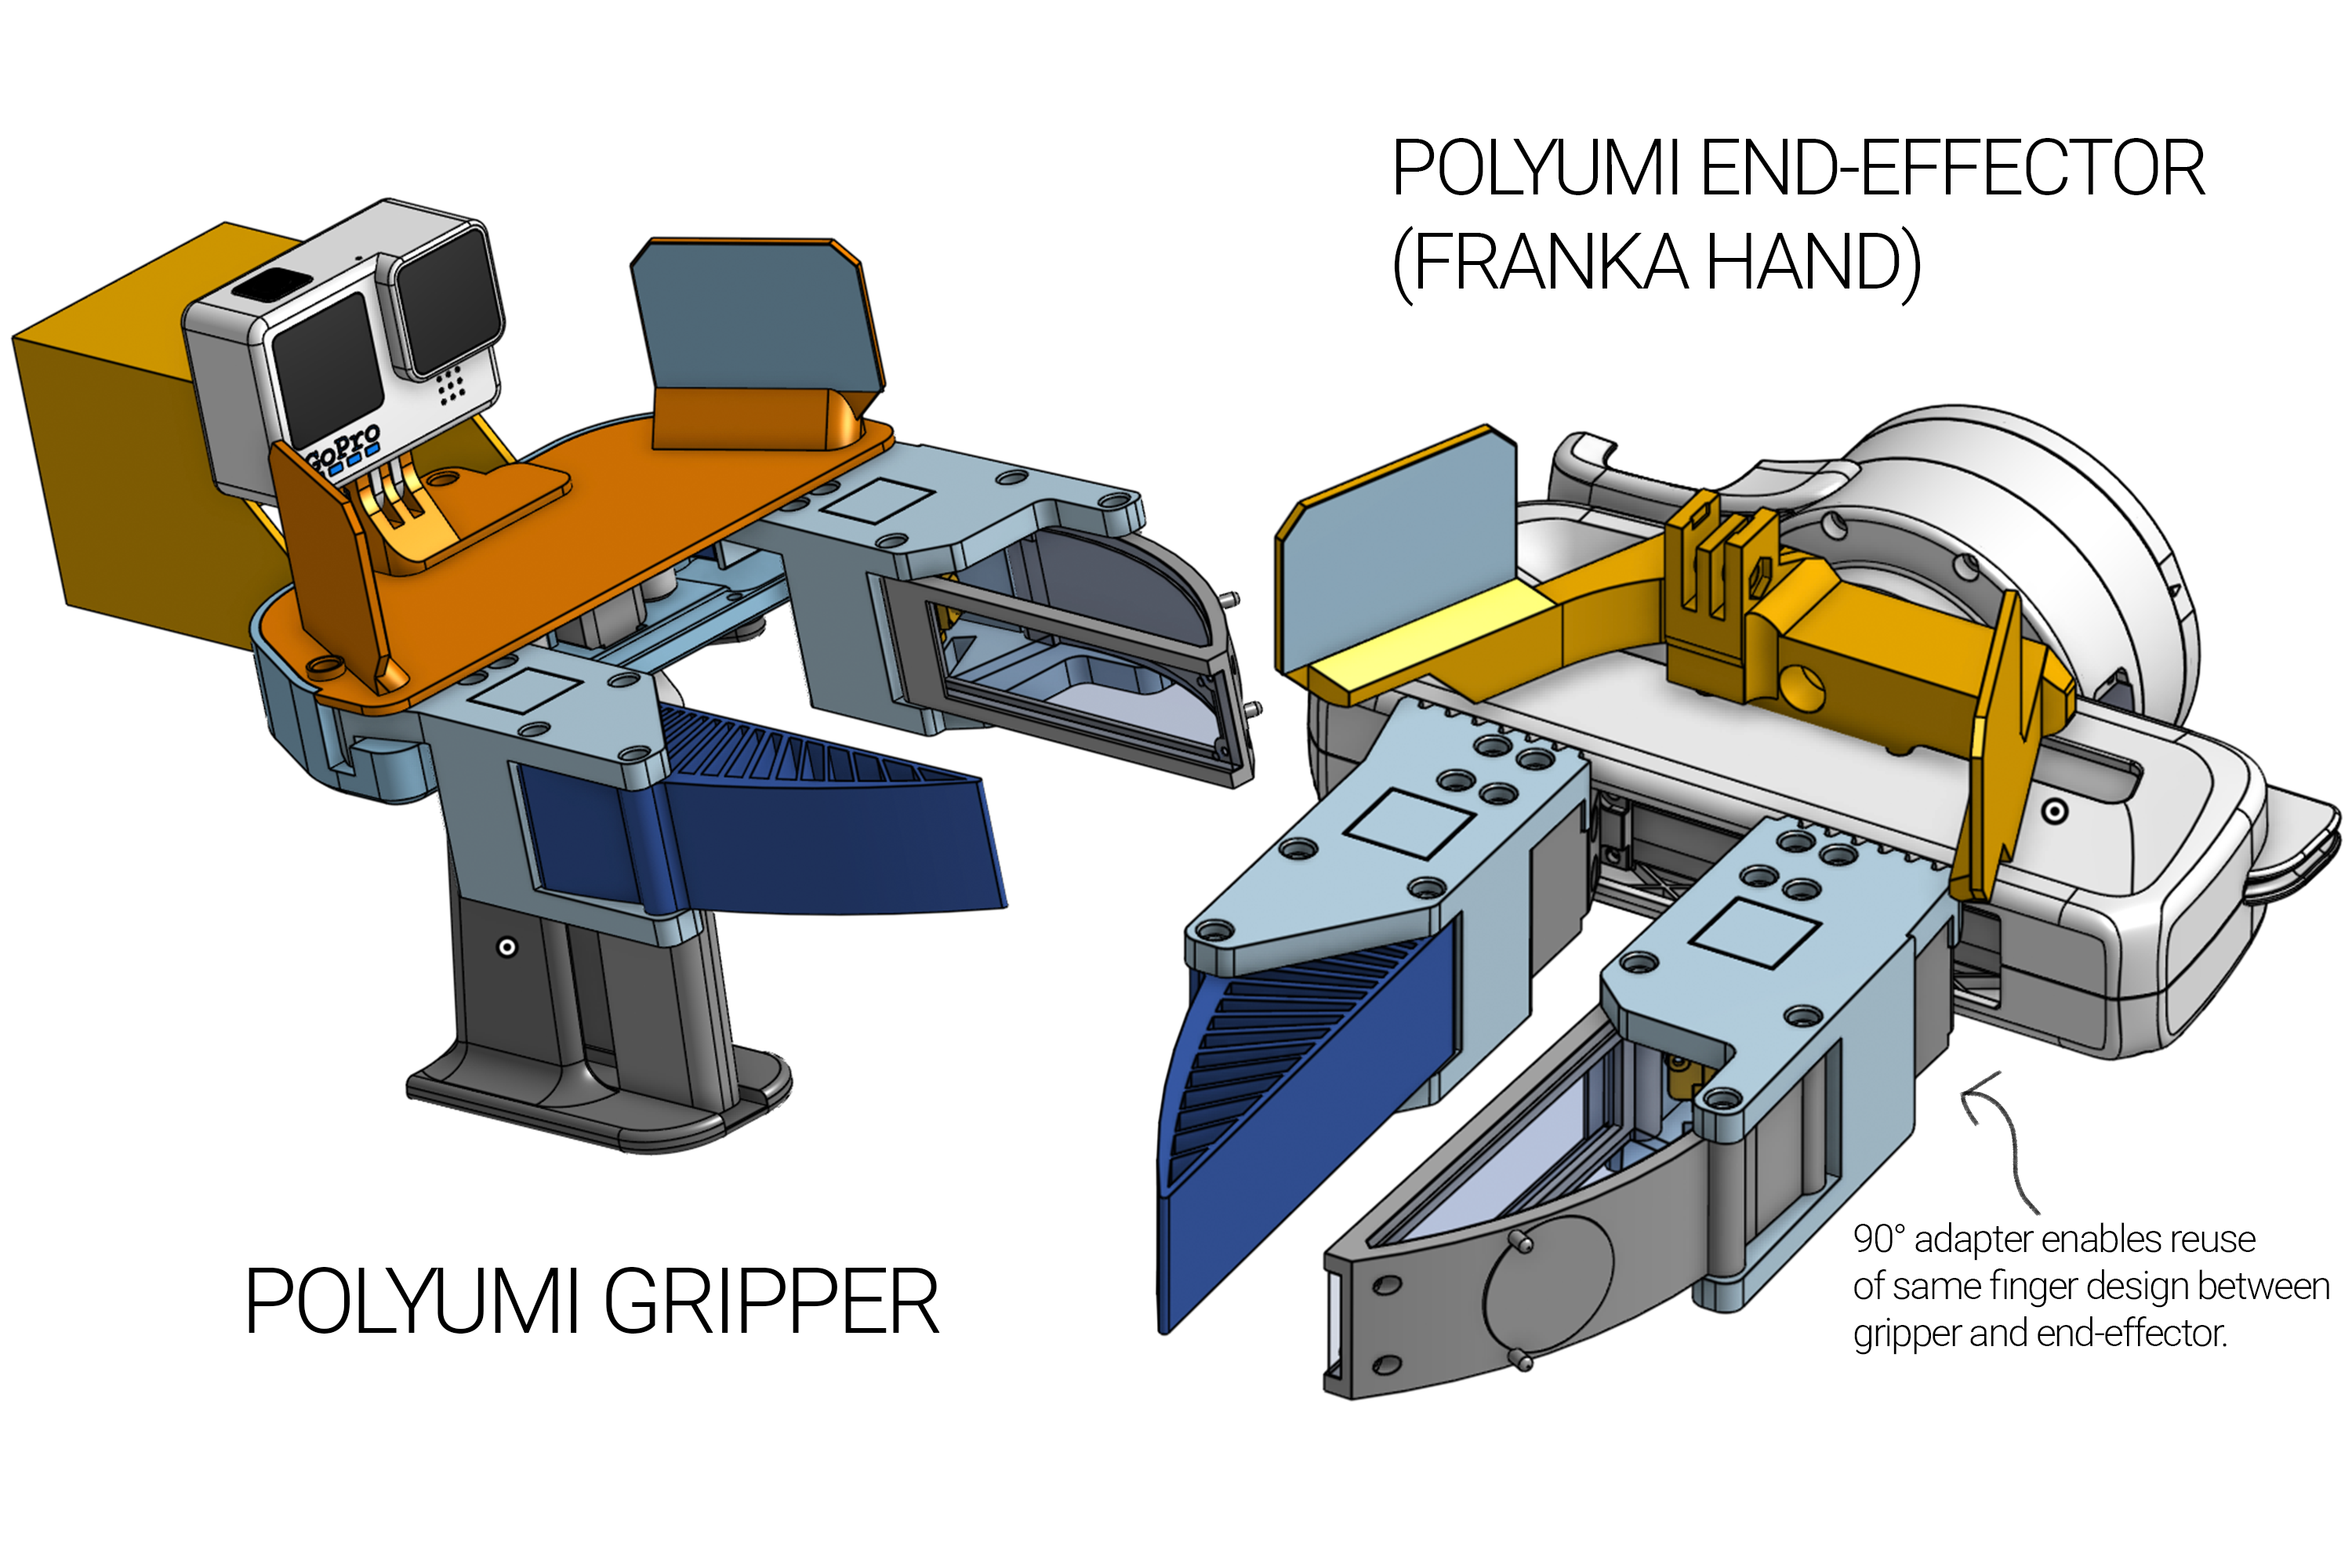
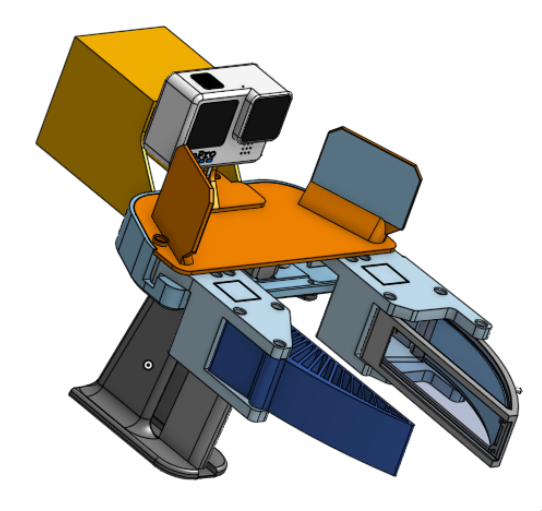
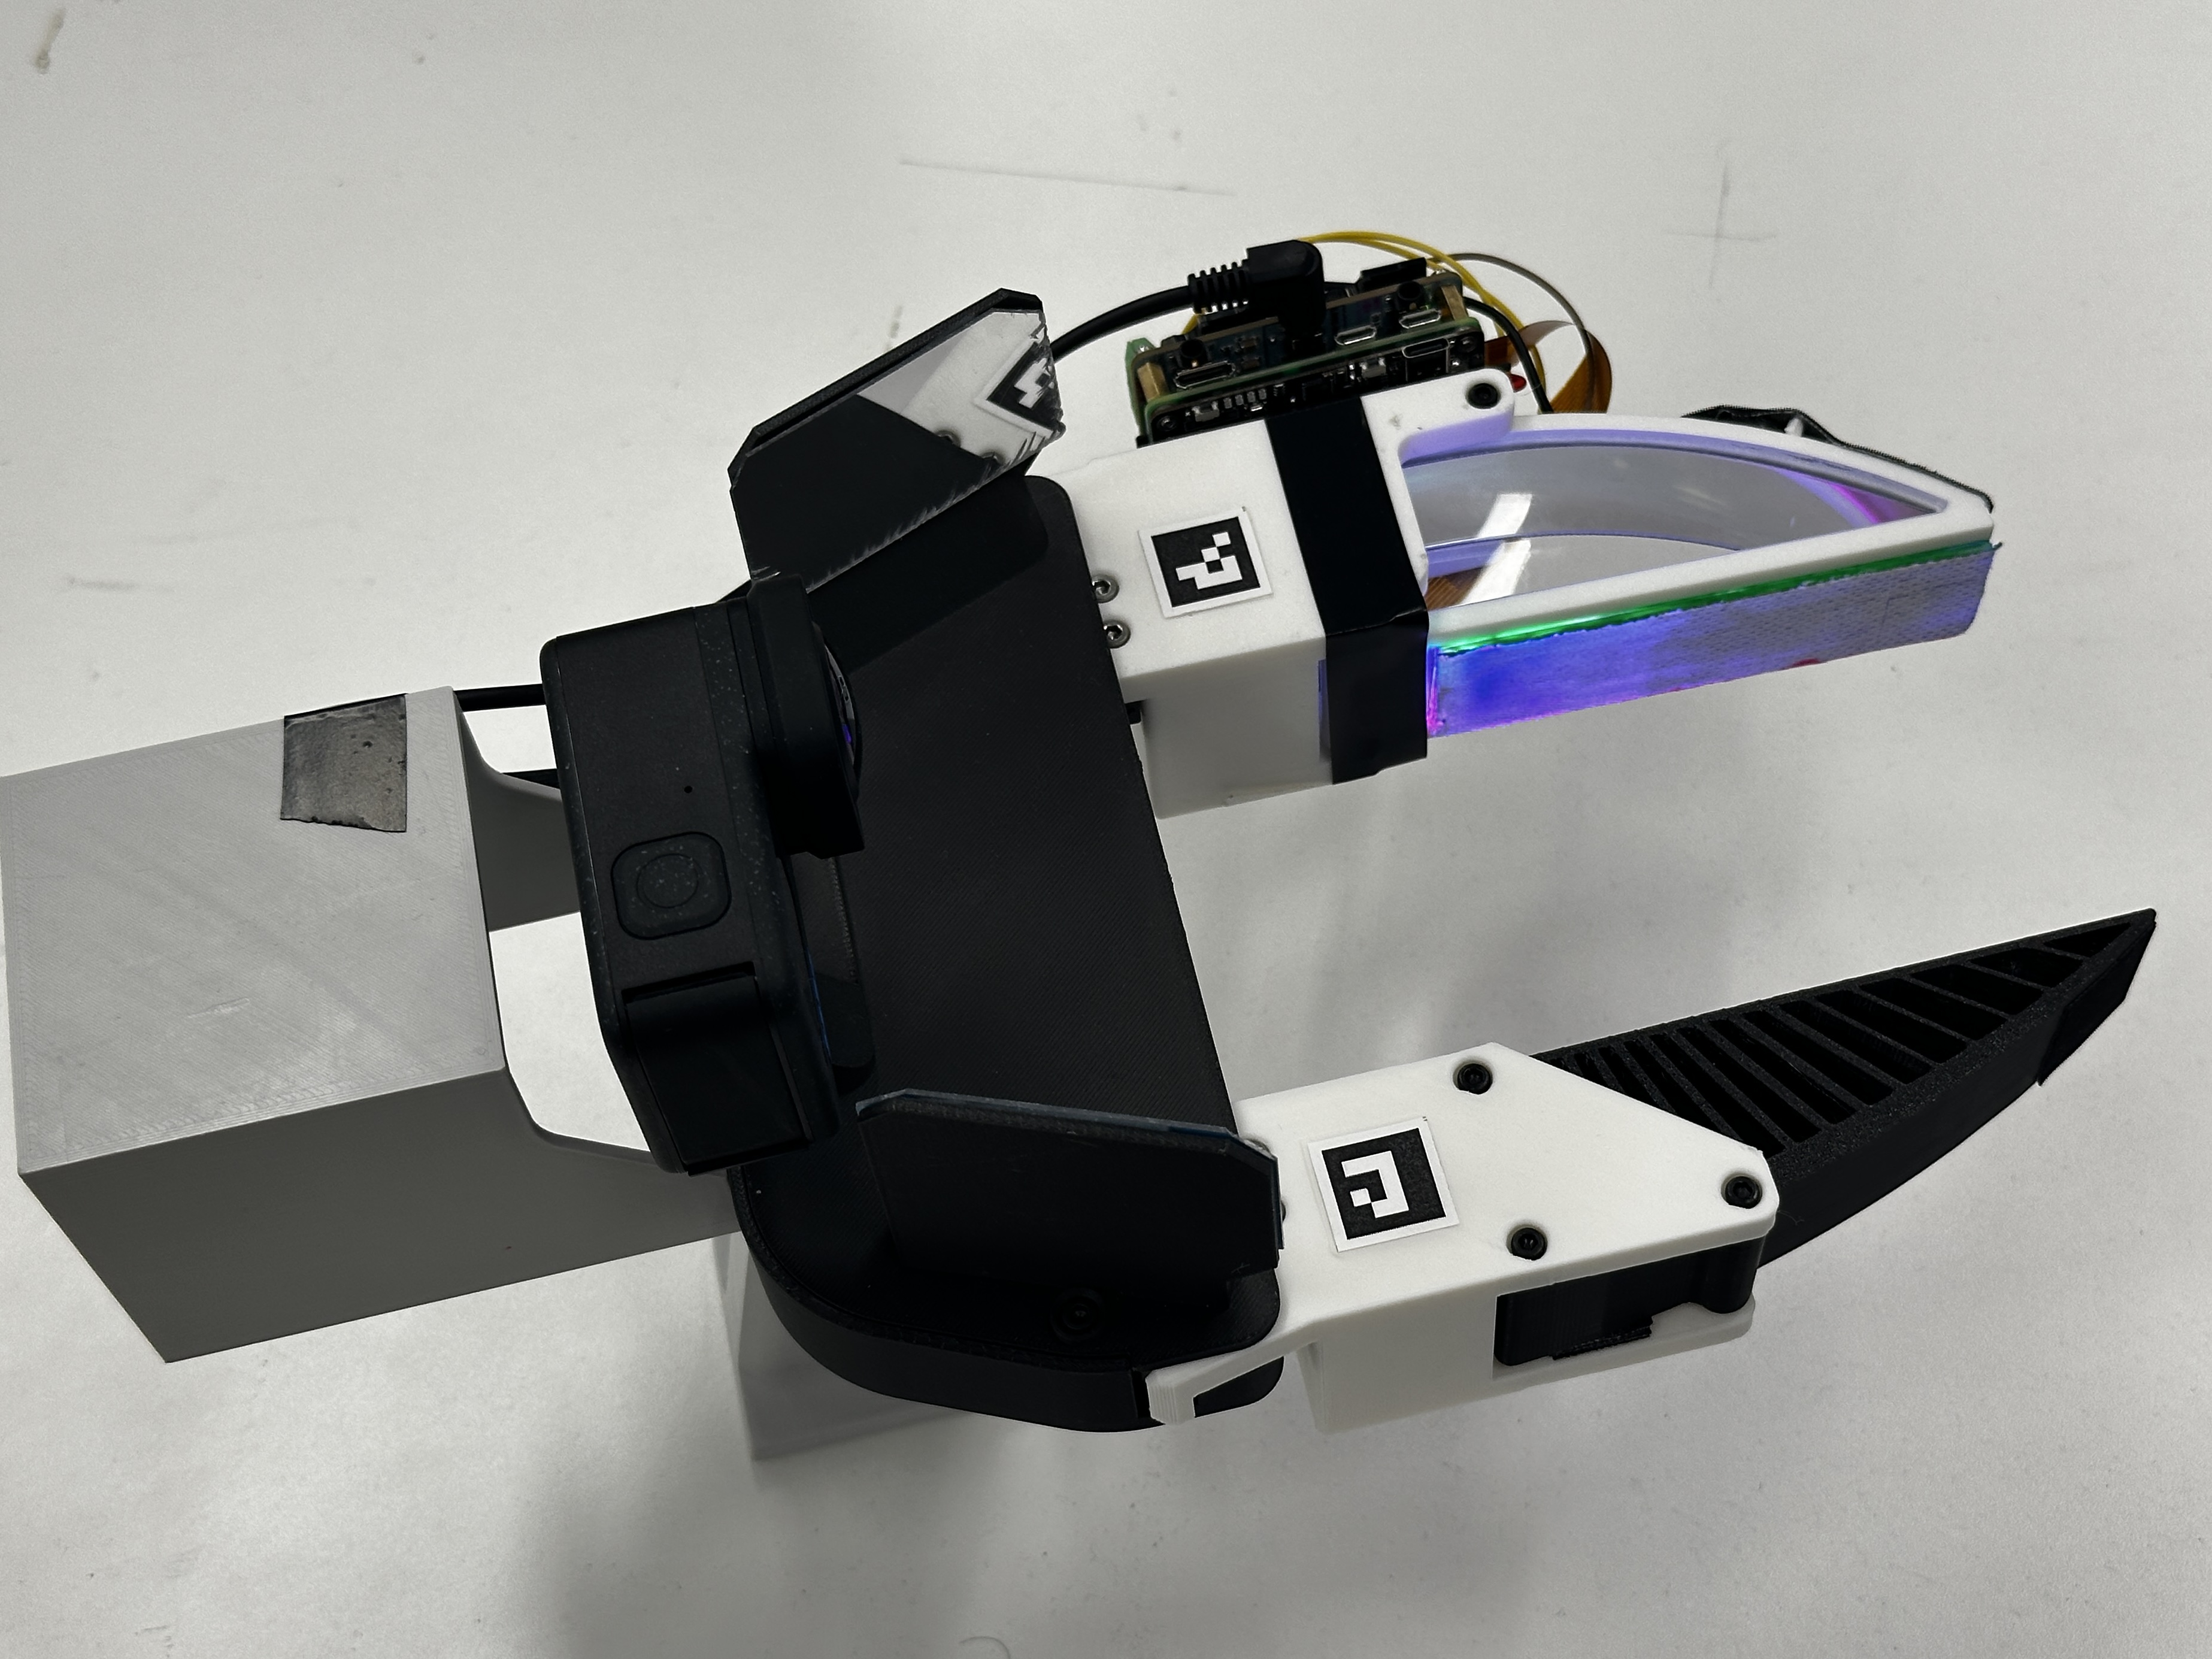
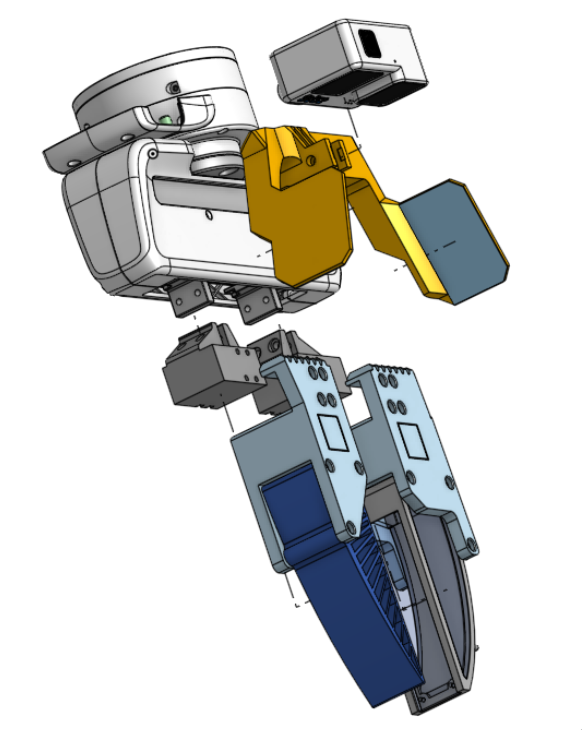
PolyUMI Gripper
UMI-style gripper supporting the PolyUMI touch sensing finger (designed & manufactured by me, with UMI’s open source gripper as a starting point)
- Fully wireless data recording, with ~5hrs of battery life. No external PC required until you want to transfer the data for processing & training.
- Start and stop recording with a touch of a single button, with all data sources time-synchronized.
- Novel mechanical, electrical, and software design to support PolyUMI’s 4 simultaneous datastreams, with a focus on ease of use and rapid iteration

PolyUMI End-Effectors
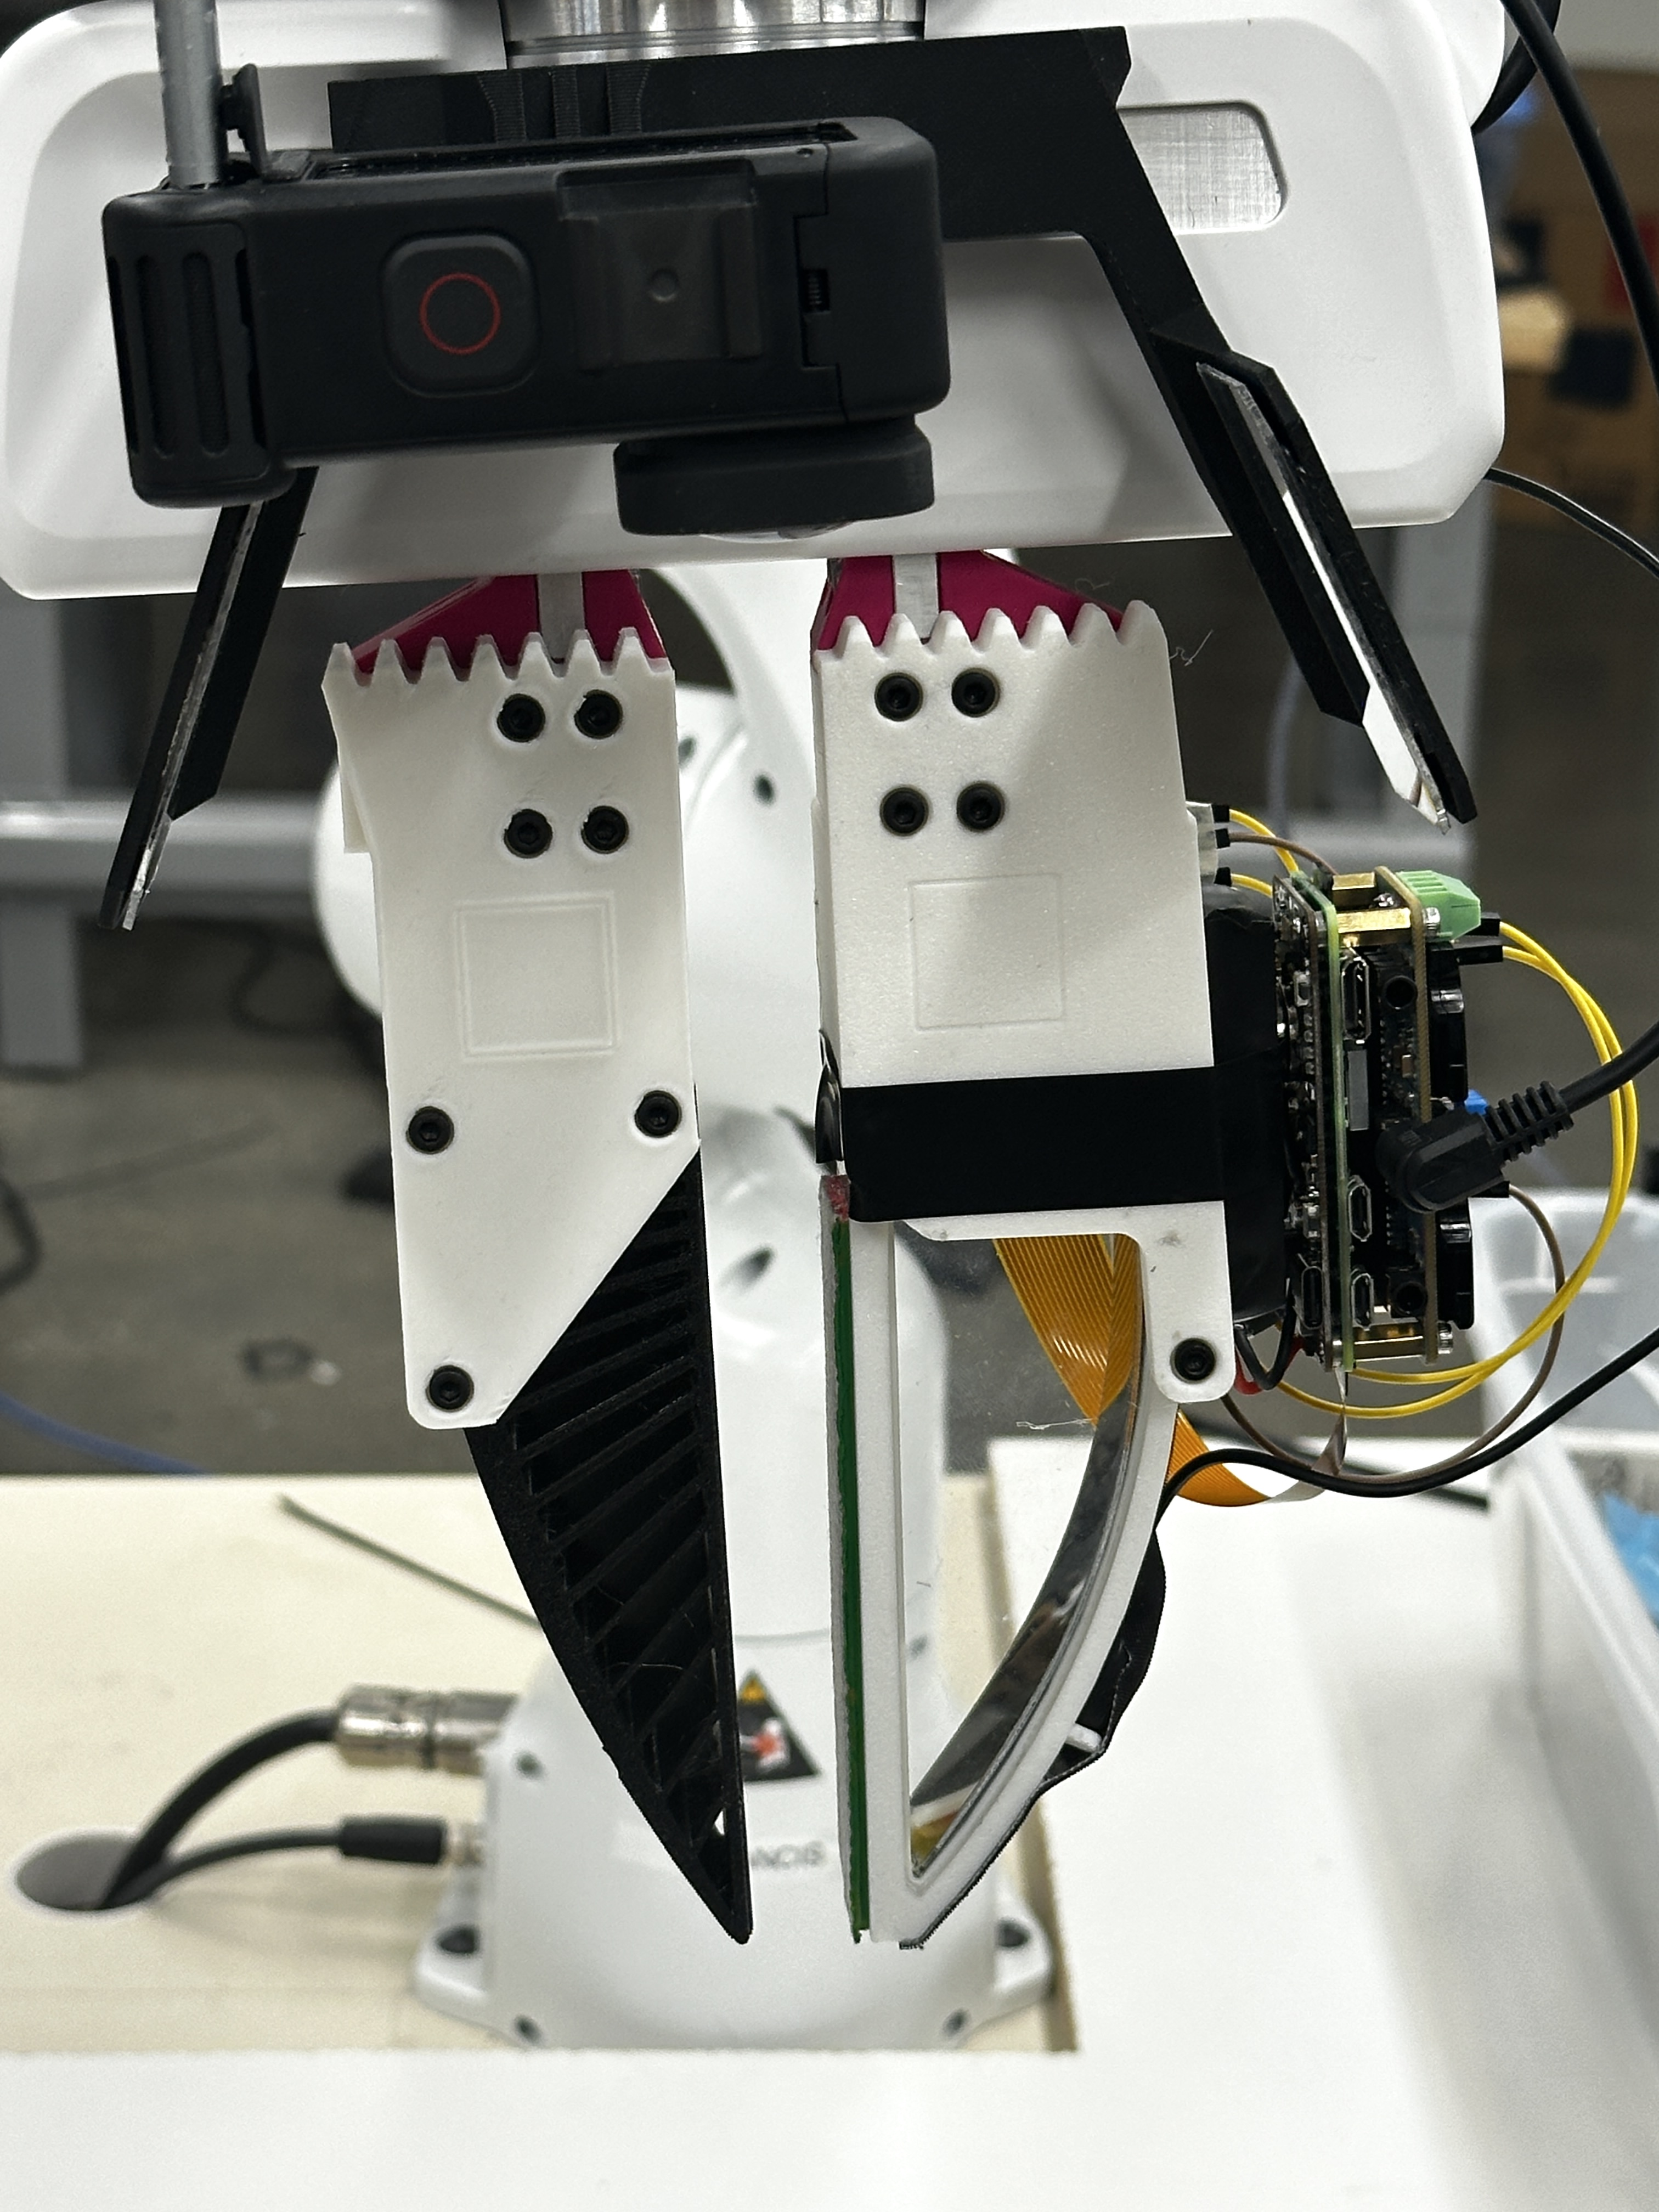
Franka Hand
PolyUMI end-effector for the Franka Hand (designed & manufactured by me)
- Maintains the same spatial relationships between sensors & fingers as the PolyUMI gripper to aid in policy transfer
- Separate finger-to-mount adapter (pink in photo left, gunmetal grey in CAD right) enable reuse of the Gripper’s finger designs on the Franka end-effector. This also enables using one physical sensing finger for both training and inference by transferring it from the Gripper to the arm, which will likely improve model performance.
Others
System can easily support other arms, humanoids, etc — anything with a wrist. Just need an end-effector hardware design for each.
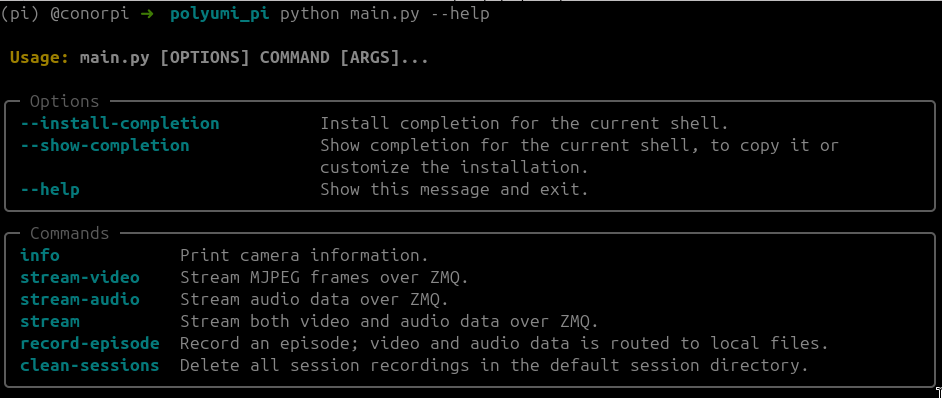
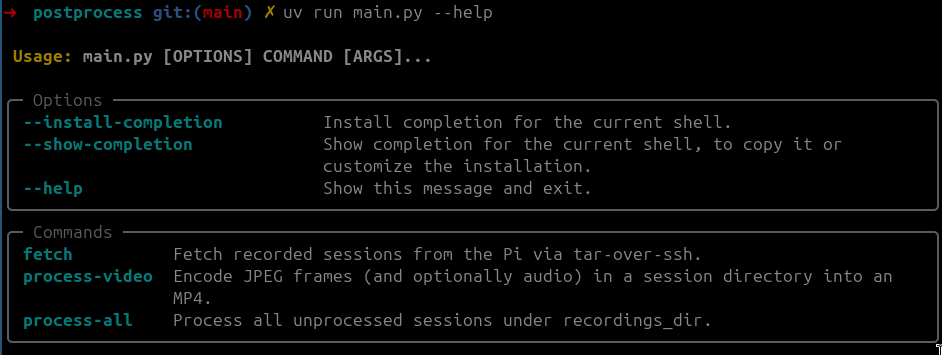
Data Pipeline
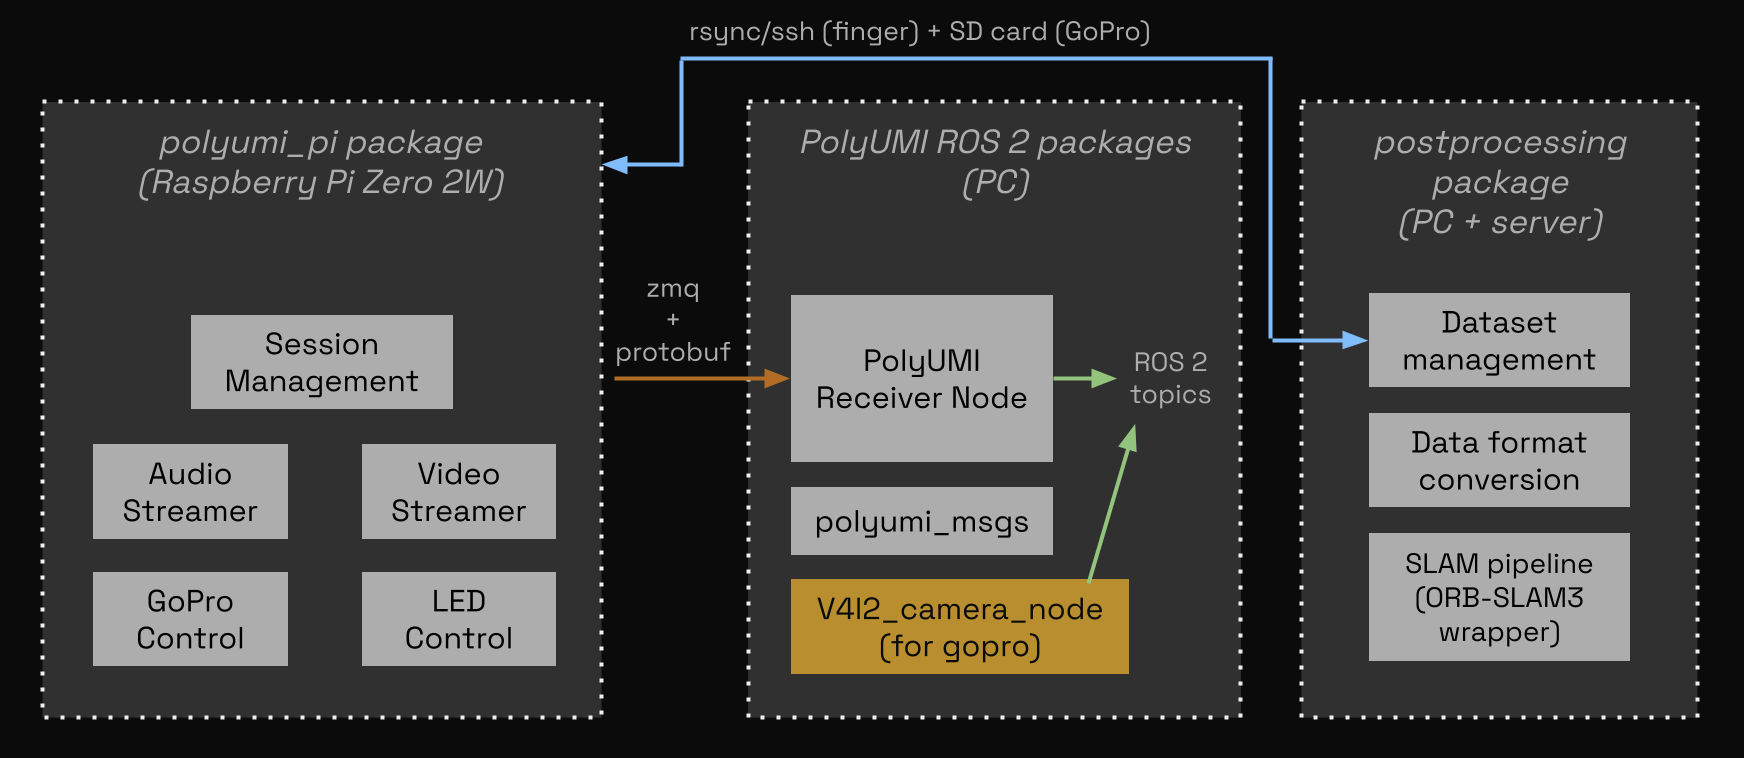
PolyUMI’s firmware and software is architected from scratch with the following priorities:
- As close to turnkey as possible.
- With this system, given a clean hardware setup, you can go from 0 to 1 in 20 minutes (nothing is installed -> livestreaming data from the arm, recording data on the gripper, and postprocessing gripper data on PC)
- Data collection & processing is quick and easy
- a single button press starts & stops data collection, and a single command fetches all recorded episodes onto PC from the gripper over the network.
- Data is ready for training
- all data is timestamped and synchronized to the same clock
- all sensors produce data at rates and resolutions standard for training robot policies (>10Hz, >540p)
- Data artifacts are well-organized
- the postprocessing pipeline gathers all data from the hardware and stores each episode at-rest in an MCAP file alongside comprehensive metadata, saving intermediate artifacts for traceability
- built for robot policy training; pipeline extensions convert at-rest format to any common dataset format (Zarr, LeRobot Dataset, etc)
- all demonstrations can be replayed or livestreamed to Foxglove
Sensors: Theory of Operation
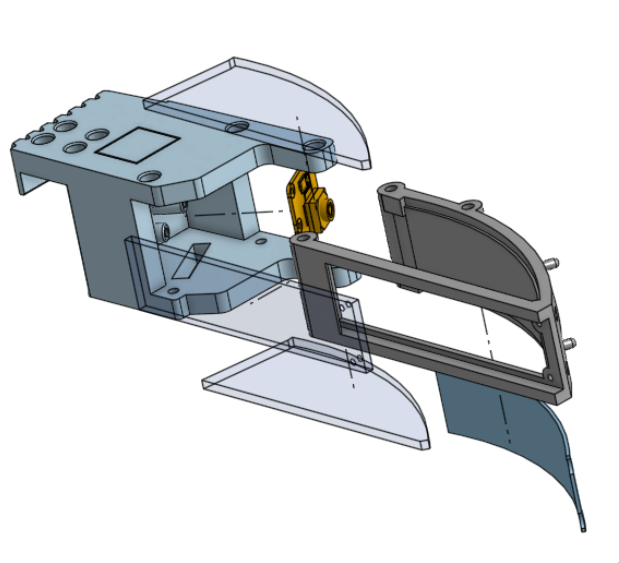
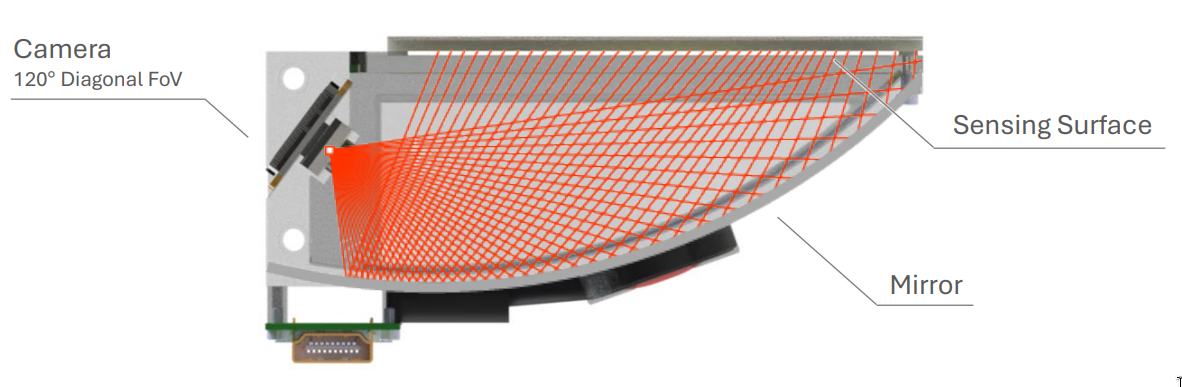
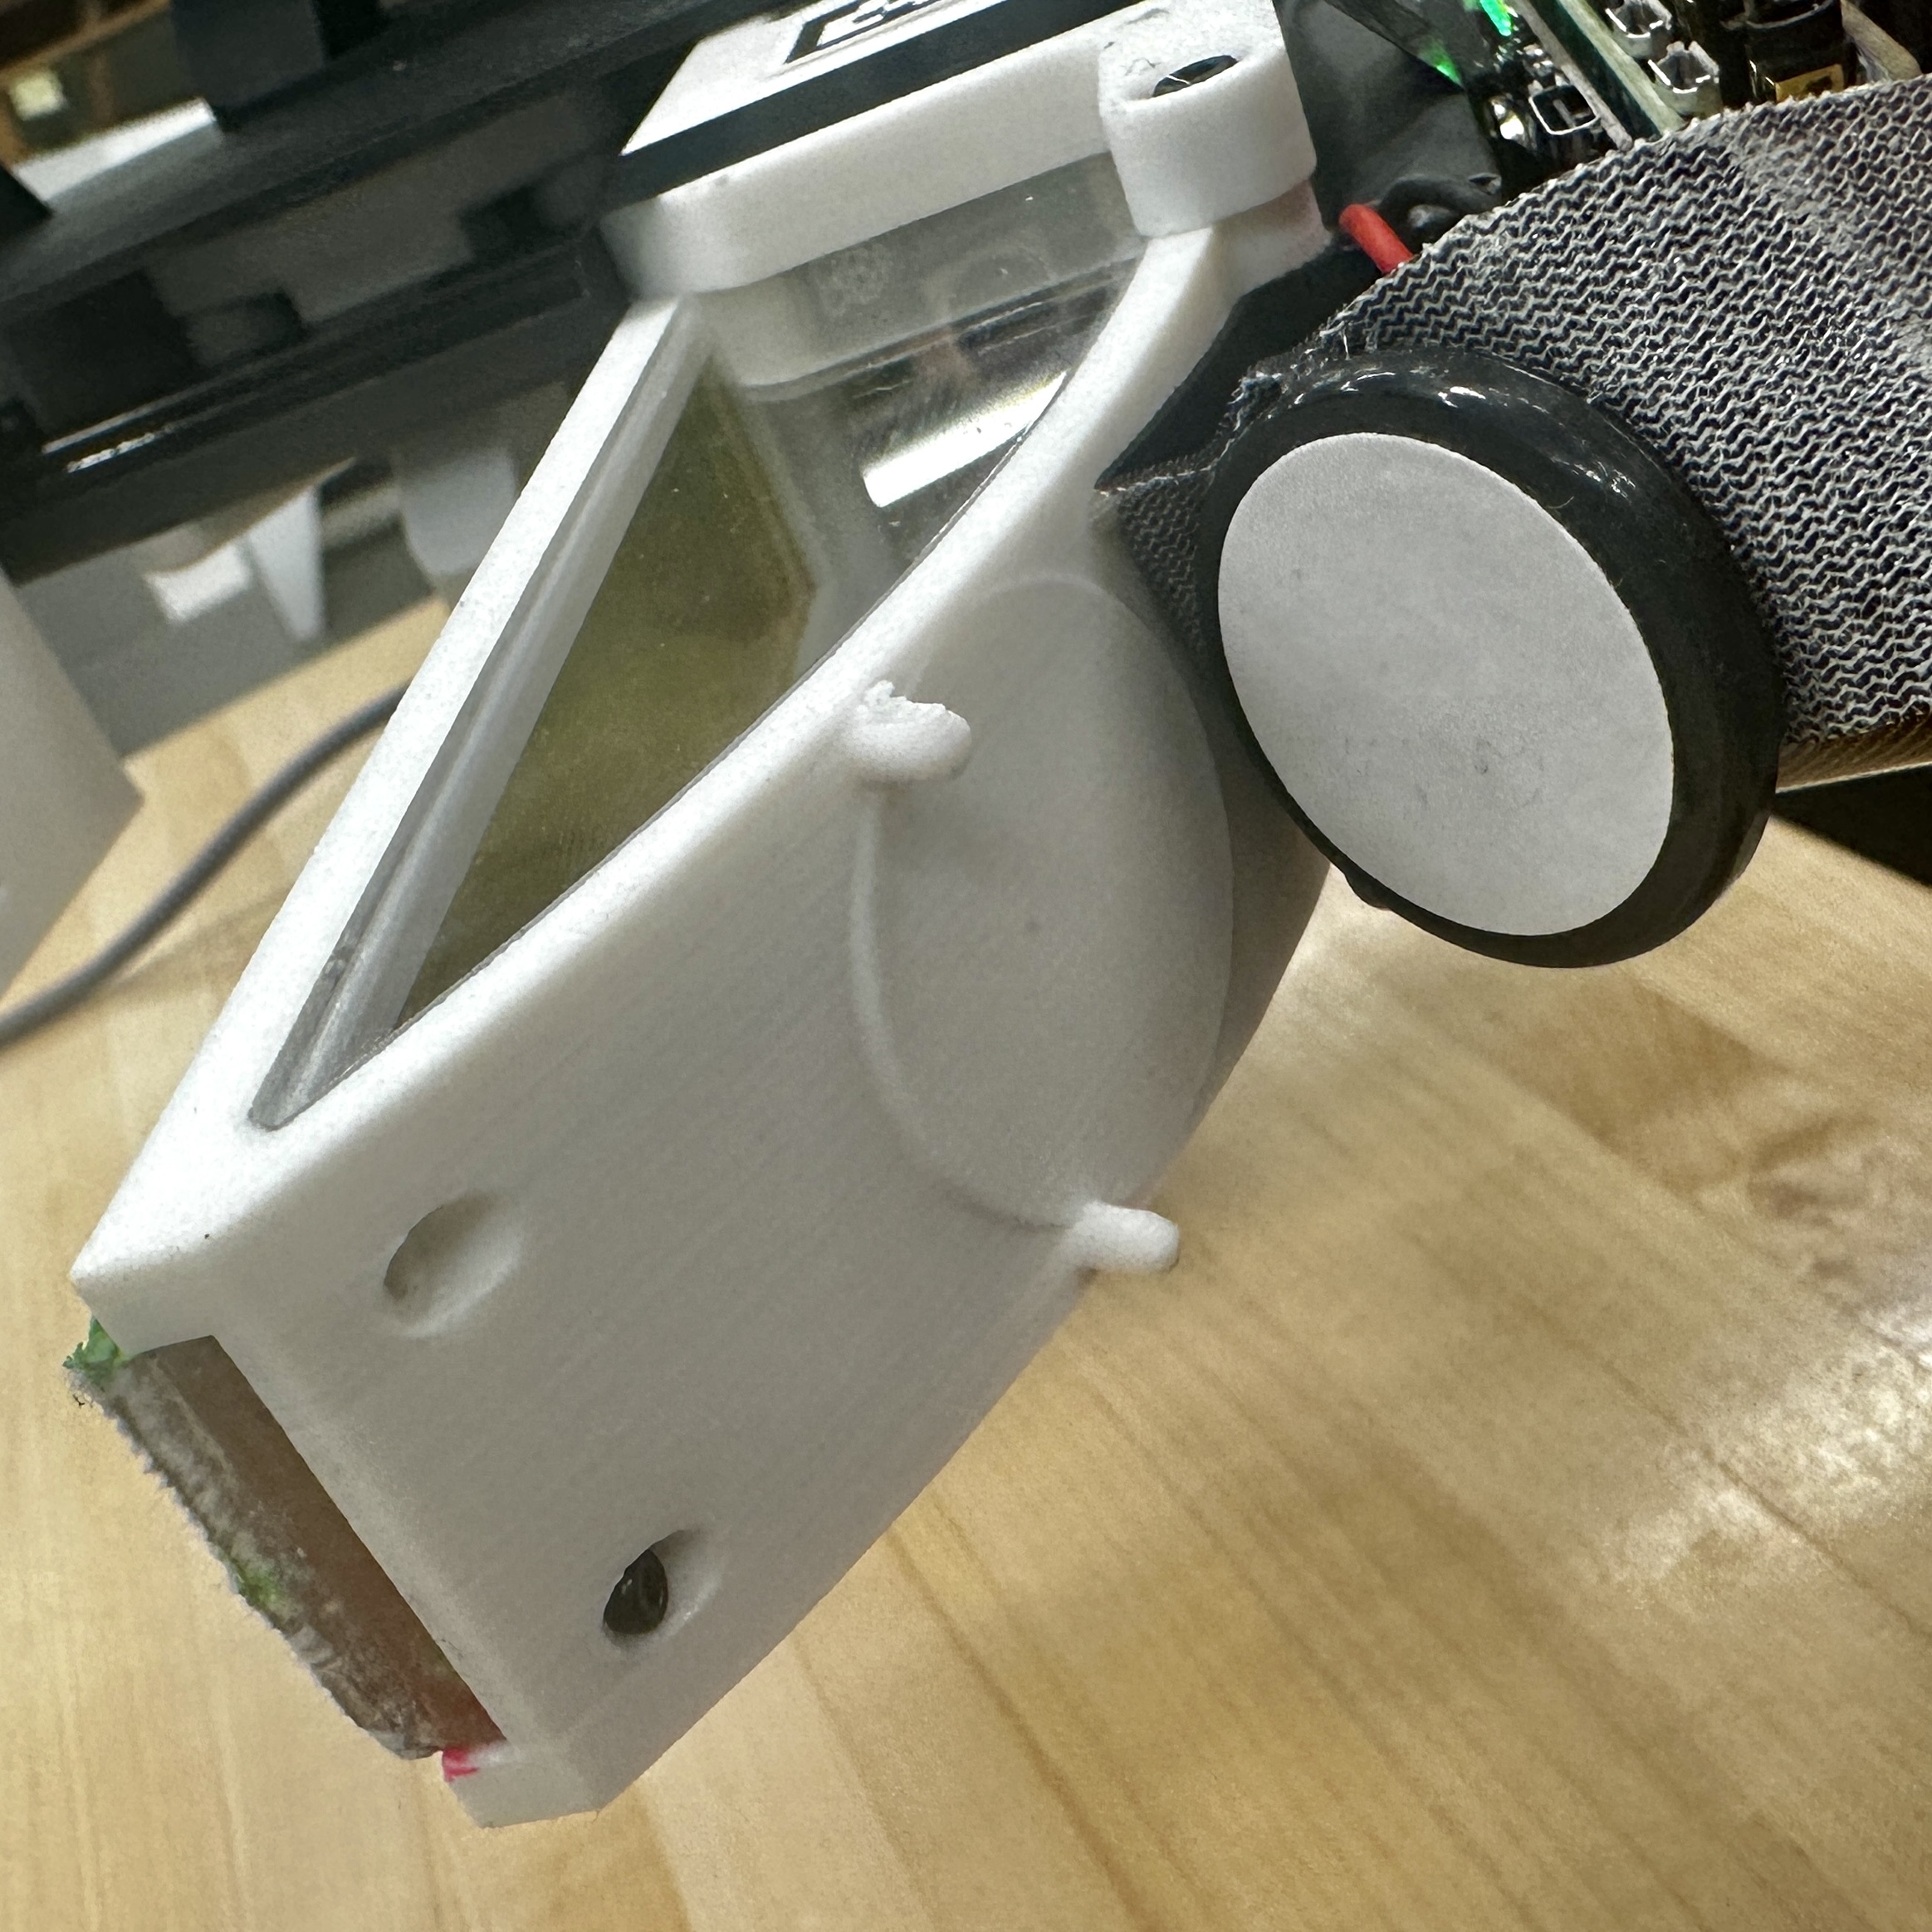
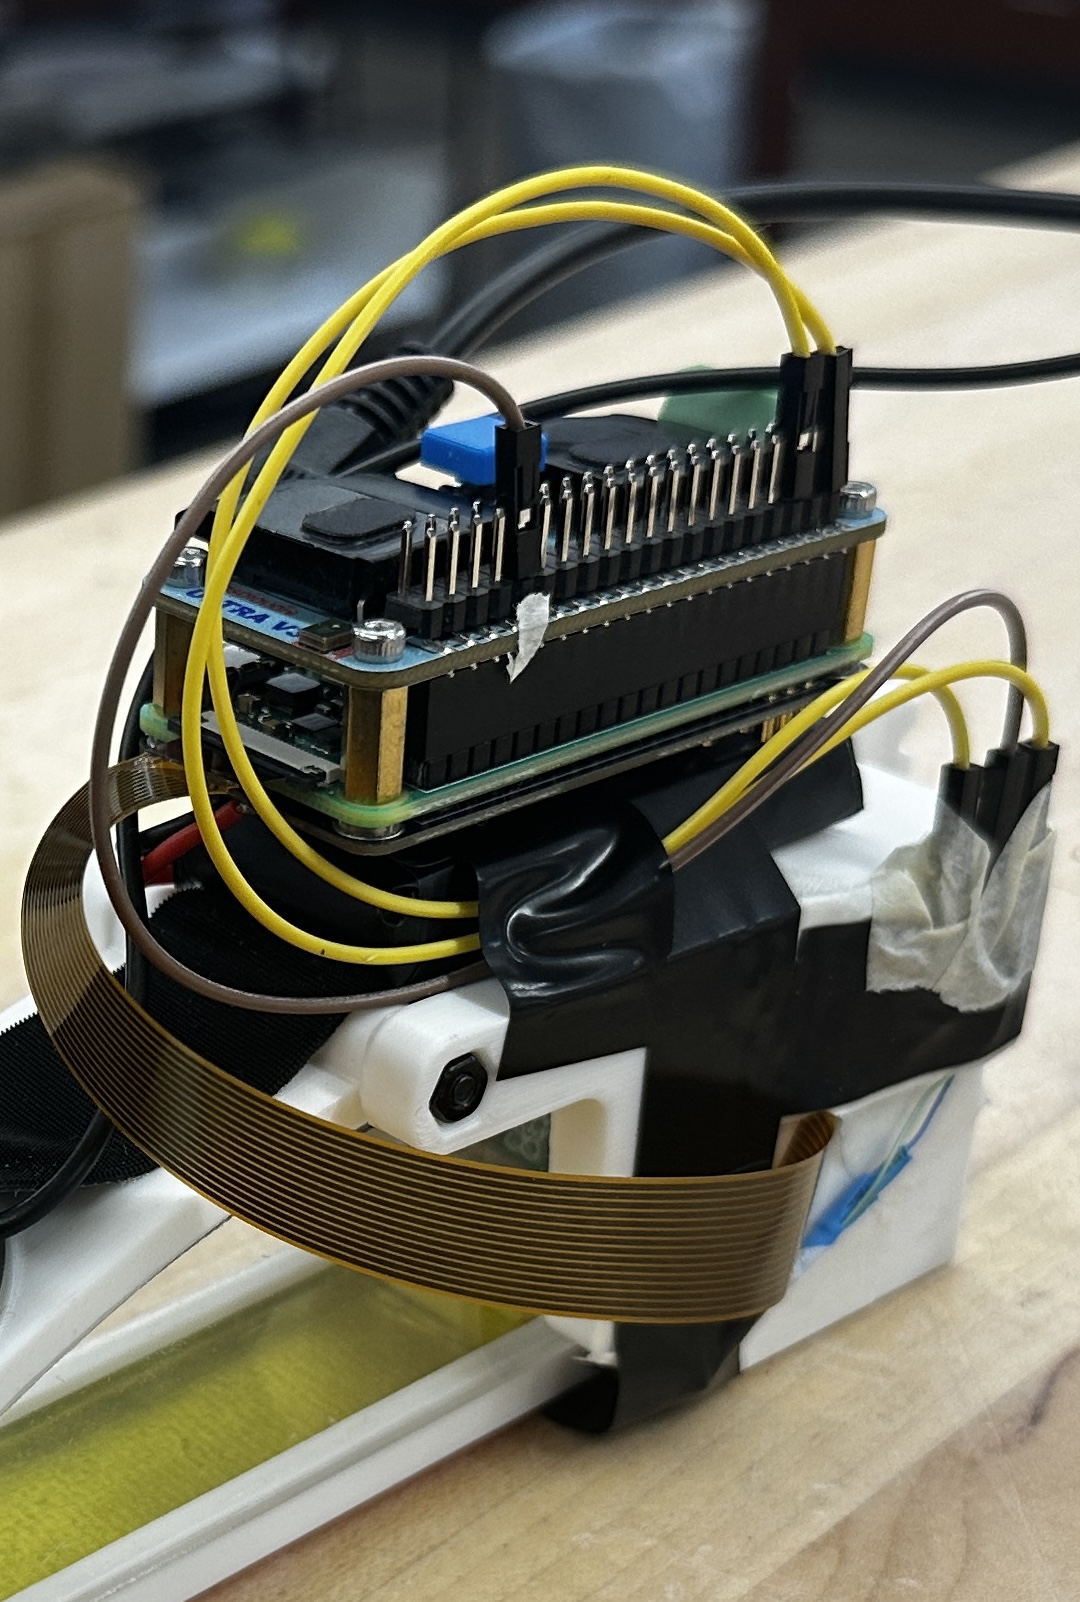
Optical Tactile Finger
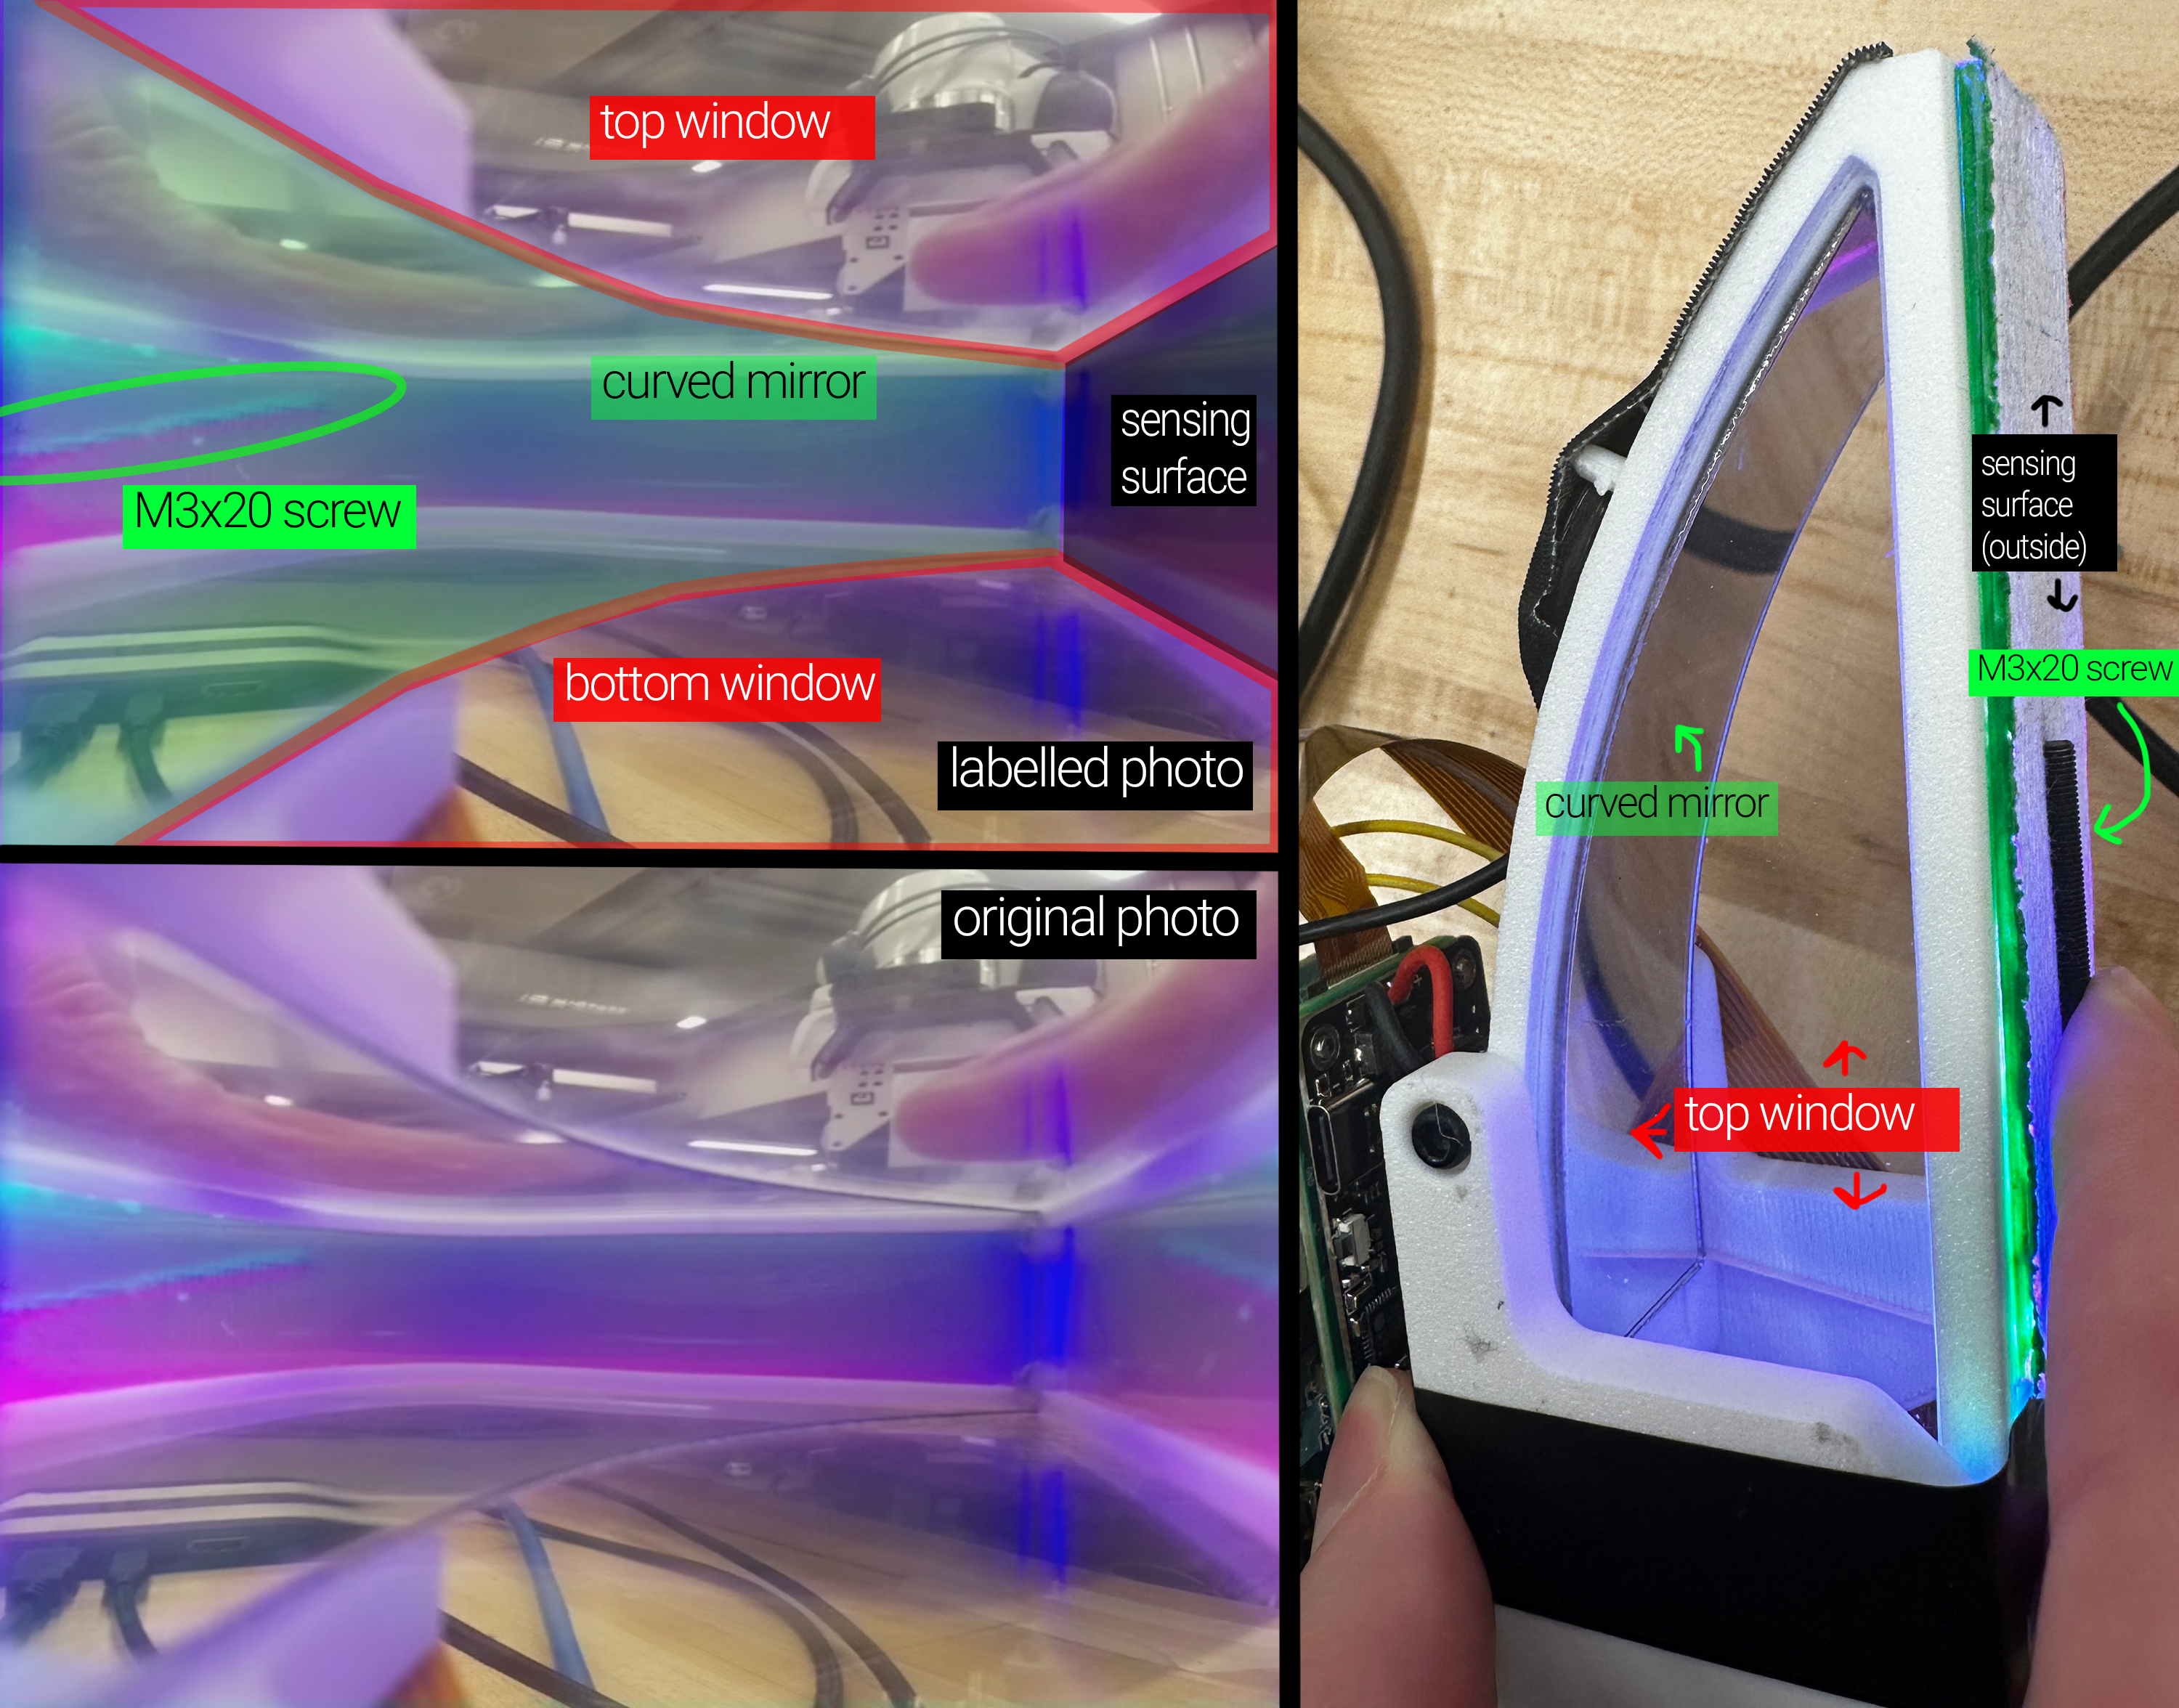
The PolyUMI finger follows the same core sensing principle as PolyTouch: a deformable sensing surface is observed by an internal camera through a curved mirror [2].
The hardware & software for the PolyUMI finger are designed and built from scratch; however, the sensing approach and system architecture draw heavily from PolyTouch. No source code or design files from that work were available — only the published paper — so all implementation details were independently developed, and modifications were made as appropriate to fit the goals of rapid iteration and integration with a UMI-style gripper design.
- Sensing surface: VHB tape for conformability, coated with aluminim powder + covered with medical tape on the outer surface for reflectivity + texture & durability (following PolyTouch). Mounted on an acrylic plate which is detachable from finger assembly for easy replacement + iteration.
- Illumination: Flexible LED tube mounted in the rear of the sensing surface (see below for ECAD + circuit diagrams, and Onshape linked above for mechanical details).
- Peripheral vision: side windows provide a secondary view of the manipulation scene, similar to PolyTouch.
- Output: 10 fps MJPEG video at 540x480 (stored in the finger as JPEG frames for efficiency, and at rest as MP4 + MCAP)
Sensing surface manufacturing instructions are here. Full build documentation including 3D print, laser cut, and mechanical + PCB assembly instructions are coming soon.
Tactile sensors inspiring this one: PolyTouch [2], GelSight [3], DenseTact [4].
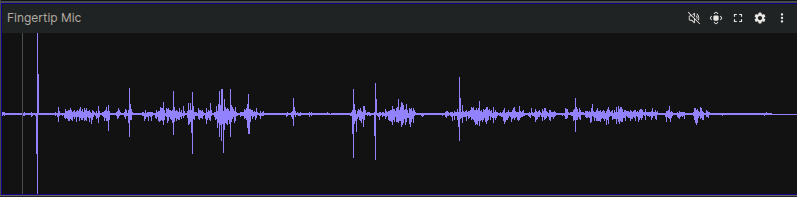
Contact Microphone
The contact microphone is rigidly coupled to the finger housing, and it mostly captures mechanical vibration traveling through the sensor body, with relatively little airborne sound. The primary purpose of this modality is to capture moments of contact between the finger and the environment, whether for precise timestamping of contact events or to capture information about the nature of the contact (e.g. a hard tap vs a soft press, or texture information from sliding contact) [5].
The audio DAC and amplification is handled prior to processing in the RPi firmware using the Raspiaudio ULTRA+ HAT, a COTS hobby audio interface board for the Raspberry Pi Zero. The contact mic itself is a low-end unit designed for use on acoustic guitars (see the BOM spreadsheet for details).
- Output: 16 kHz mono PCM audio (stored at rest as WAV container, MCAP)
Wrist Camera
This sensing system follows the UMI design with minor hardware updates for a new GoPro version (Hero 12 vs. Hero 9) [1]. PolyUMI also adds BLE-based control of the GoPro from the gripper’s onboard SBC (Raspberry Pi Zero 2W), which is required to synchronize timestamps for all sensor datastreams & ensure that the sensors begin recording at the same time.
- GoPro Hero 12 + MAX Lens Mod 2.0 (approximately 177 deg FOV)
- Side mirrors provide a binocular view of the manipulated object.
- Output:: 60 fps video at rest as MP4
- Control: via Open GoPro’s BLE API from the gripper’s onboard Raspberry Pi
Proprioception
Embodiment Proprioception
When mounted to an arm or any other embodiment, joint angle data can be sourced directly from motor encoders, and EE pose can be trivially obtained through forward kinematics.
For the Franka arm, this data is all availble directly from the libfranka API.
PolyUMI Gripper Proprioception
When data is collected from the gripper alone, proprioceptive information must be derived from other sensor data. In particular, PolyUMI follows the original UMI paper in using ORB-SLAM3’s monocular-inertial SLAM implementation to derive a 6DoF pose trajectory using the GoPro’s video feed and integrated IMU [1, 6]. Gripper width is calculated using the ArUco tags on the gripper fingers.
Then, an embodiment-specific IK solver can be used to map this pose trajectory to a trajectory in joint-space.
System Architecture and Design
- Full BOM is here.
Mechanical
- CAD resources: Gripper and Franka Mount Onshape documents (linked above).
- 6 new parts designed:
- PolyUMI sensor finger (4 parts):
- Finger shell – housing for the mirror, sensing surface, LED strip, and contact mic.
- Finger holder – encloses rear of finger, and mounts the finger camera + raspberry pi stack
- Side window(s) + sensor surface acrylic - completes finger enclosure
- Franka EE (2 parts):
- Finger adapter - adapts the Franka Hand’s parallel gripper fingers to the PolyUMI’s fingers
- Gopro + mirror mount - mounts the GoPro and mirrors to the Franka Hand
- PolyUMI sensor finger (4 parts):
- Additional modifications:
- The original fin-ray finger + UMI finger mount were slightly enlarged to match the dimensions of the sensing finger.
- The remaining parts of the original UMI (core trigger mechanism + GoPro mount + finger rail) were left identical to the original; this also enables existing users of the UMI to switch out only the fingers to switch to the PolyUMI system.
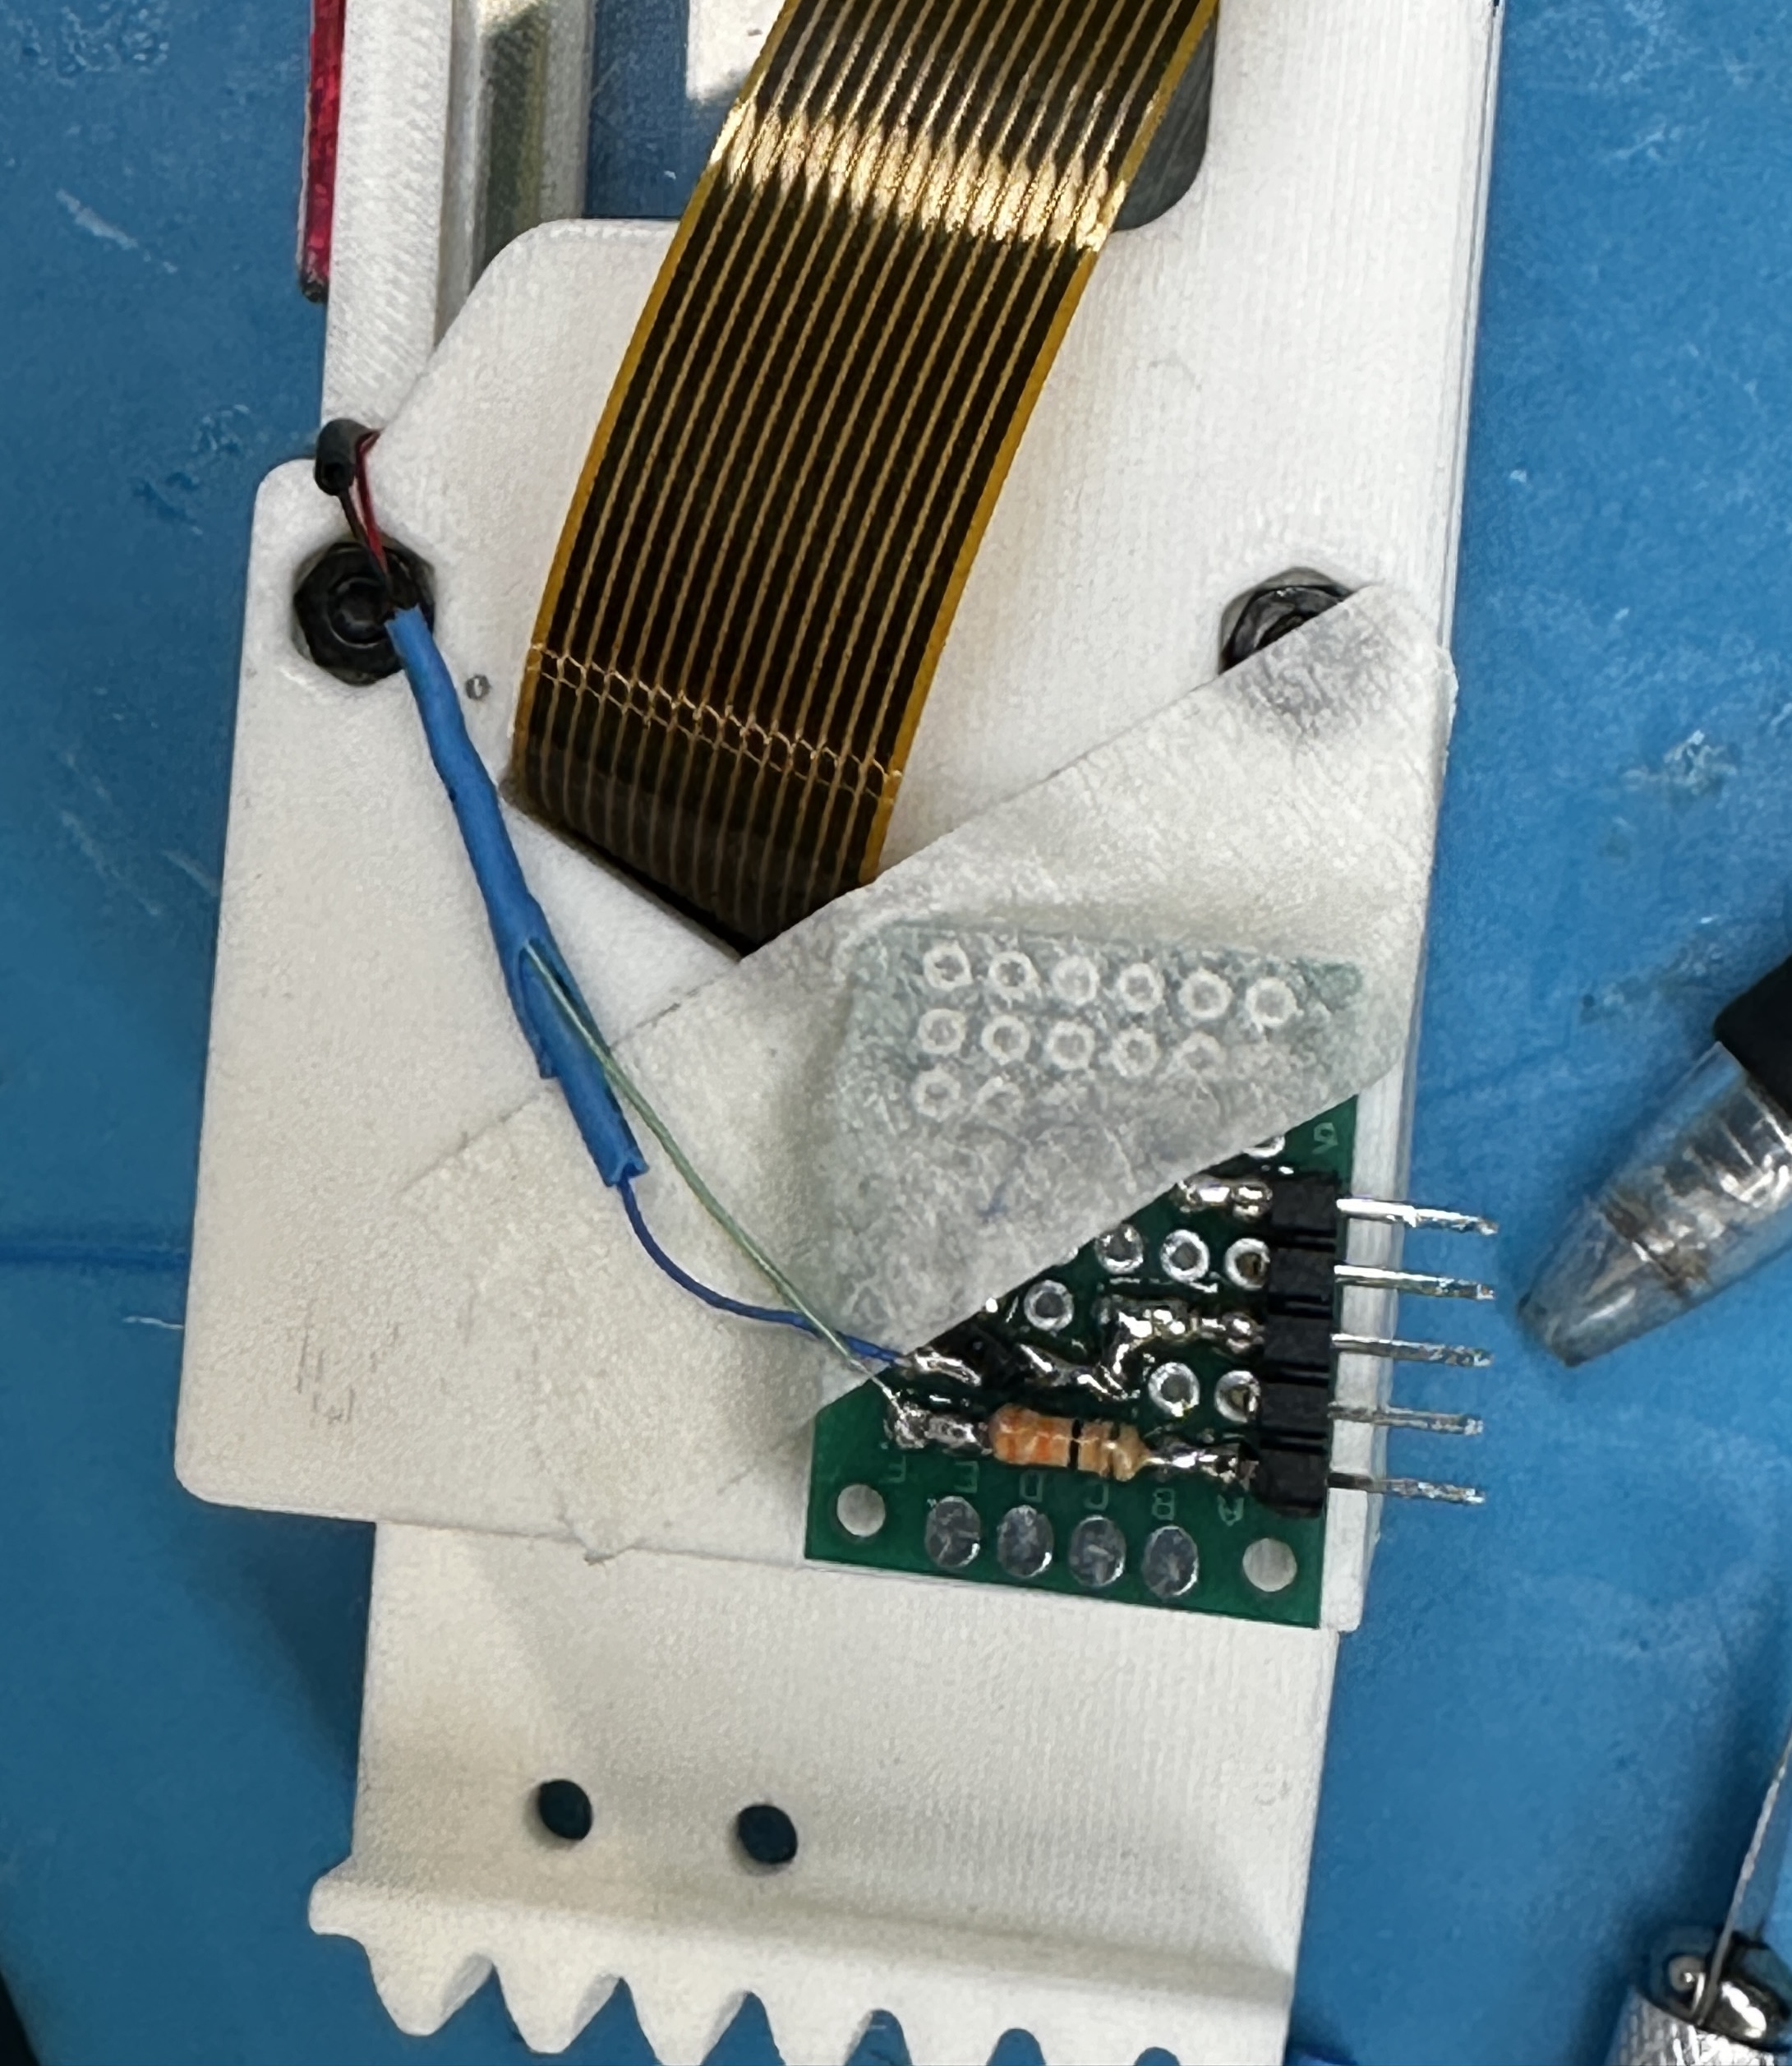
Electrical

Software
Next Steps
- hardware design improvements
- add second LED strip at fingertip; design custom LED pcb
- need better illumination at front of sensor
- better control over light orientation (the current tube gets twisted), more mechanical robustness, and smaller form factor
- optimize mirror curvature + camera placement to minimize distortion, variation in effective sensing surface distance (so it all fits in the same depth-of-field), and blind spots (currently there’s one at the rear of the sensor)
- sensing surface stiffness - experiment with materials to make it softer
- add second LED strip at fingertip; design custom LED pcb
- slam pipeline robustness improvements
- implement inference + training infrastructure, and evaluate various policies! planning to explore
- diffusion policy
- ACT
- various VLA’s with SFT
- RL-based fine-tuning of all for failure recovery
- others TBD
- publish :)
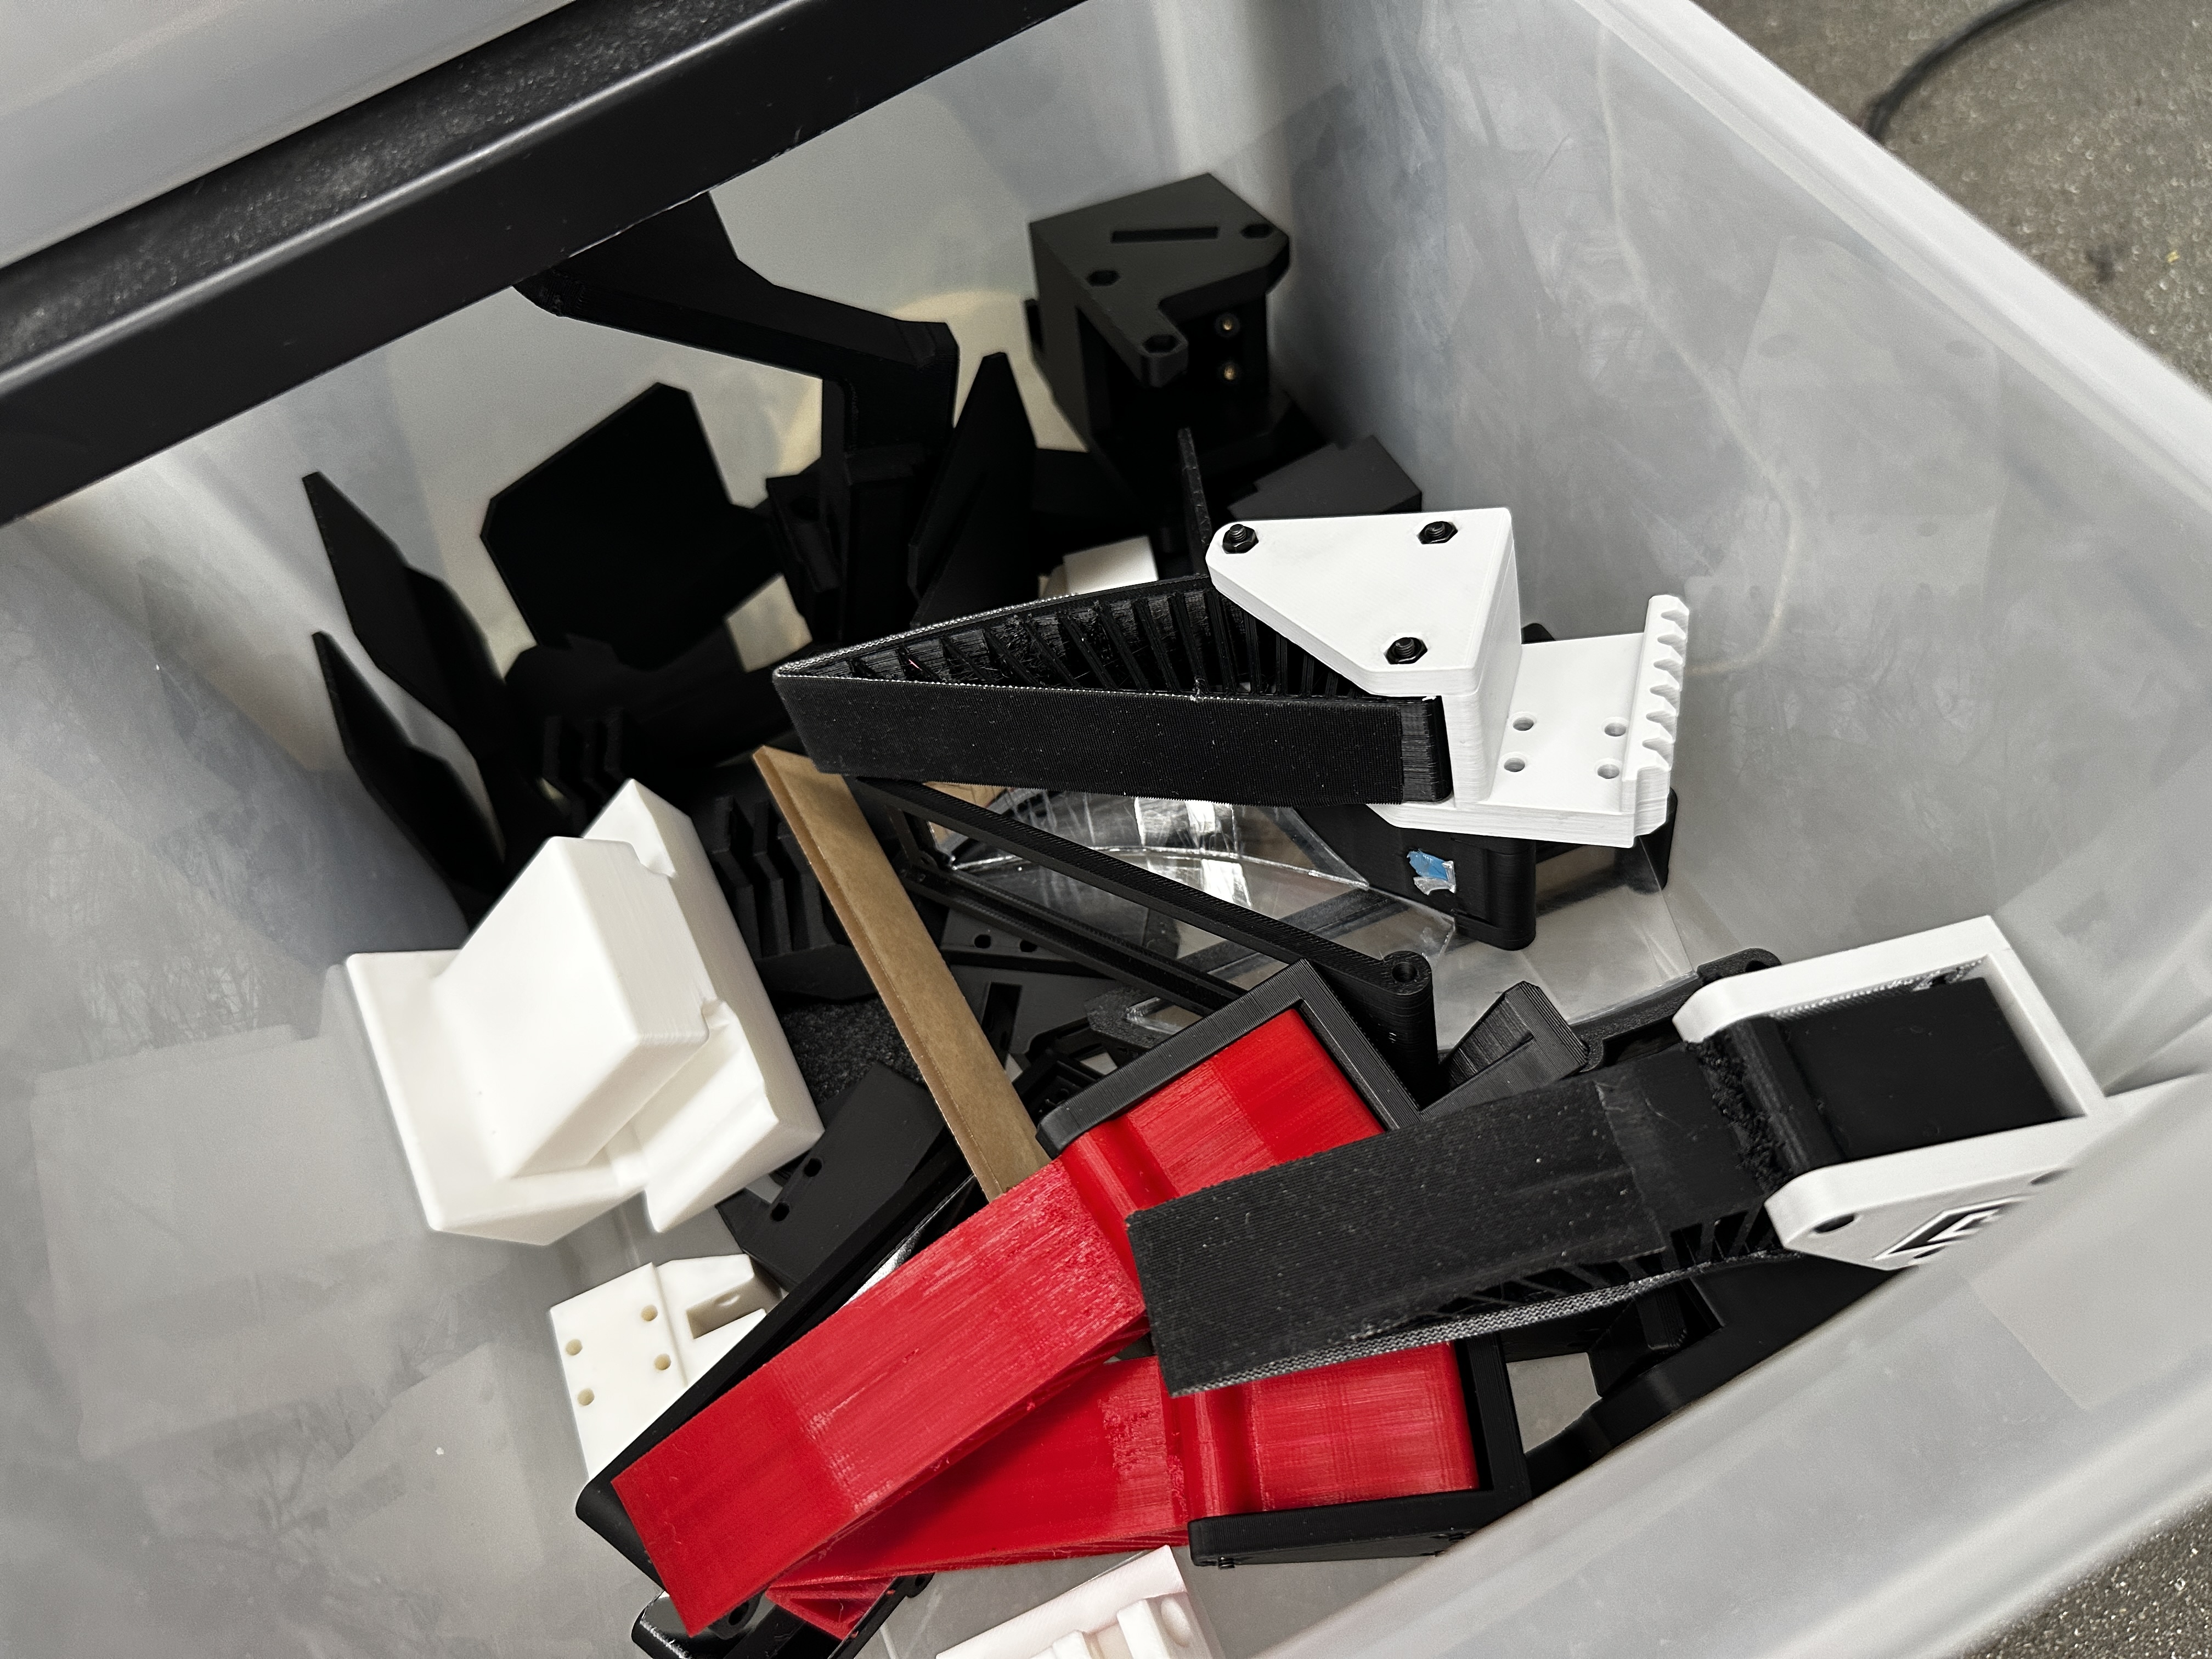
Here is a graveyard of not-quite-right prints, failed cuts, broken mirrors, and also a nice jig for doing heat-set inserts for the camera mount, which is at an awkward angle inside the finger housing cavity.
References
- Universal Manipulation Interface (UMI). Project page and publication links. https://umi-gripper.github.io/
- PolyTouch tactile + audio sensor. Project page and publication links. https://polytouch.alanz.info/
- GelSight tactile sensing technology. https://www.gelsight.com/
- DenseTact optical tactile sensor. https://techfinder.stanford.edu/technology/densetact-optical-tactile-sensor
- ManiWAV: Learning robot manipulation from in-the-wild audio-visual data. Project page and publication links. https://mani-wav.github.io/
- ORB-SLAM3 repository and related paper resources. https://github.com/UZ-SLAMLab/ORB_SLAM3